Showing posts with label stairs. Show all posts

Saturday, April 29, 2017

Roof Stuff

So - two of our last major renovation projects just collided - 1) We had a contractor last summer install a vent through the roof of the sleeping porch to vent the toilet in the half bath below, and 2) we then sheetrocked the sleeping porch, trying to finish out the space. (10 points if you can guess what comes next)

we have a leak. 

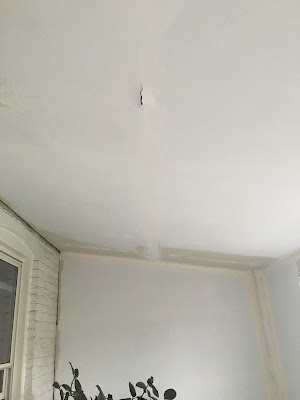
So - it turns out that the vent was not installed properly, water slowly got into the roof, and one night during an intense storm - we heard dripping and saw a steady stream of water coming right through our newly sheetrocked ceiling.

this vent is somehow improper. 

Getting Estimates
We reached out to two roofing companies based on Angie's list and yelp reviews for quotes to fix the leaking roof. Since they were going to be up there anyway, we thought this would be a nice chance to put in some more skylights to add natural light to our bedroom and the spare room beside it (something we've always wanted to do), and to take a look at the nasty skylight in the bathroom, which is a constant eyesore. Inevitably, both companies also found a couple other problems on the roof, stuff that was either installed incorrectly or just old and needed to be replaced. Thankfully, both companies said that the main roof was in good shape - a huge relief.

a view of the bathroom skylight from below

I don't think it's supposed to do that.

 
our big old skylight with some chimney leftovers

Both companies had different approaches to the issues - one wanted to just patch the roof and clean up the old skylight, while the other wanted to rip off and replace both. One company wanted to install two new skylights in the bedroom, while the other wanted to install solar tubes. We weighed both options, decided we wanted to do half of one quote and half of the other - and then I managed to negotiate the one company to match the other - so we got 2 new skylights in the master suite, replacing the old skylight, and ripping off and replacing the sleeping porch roof - all for the cost of the original quote. (I am apparently a master negotiator). We signed the contract and were ready to go the next morning.

Placement Issues:
So once we knew who we were using and had settled on skylights (instead of solar tubes), we had to tell them where to put them. This was a bigger issue than you might think, since we have lots of future plans for these spaces. We wanted the skylights centered in their rooms, but we have plans that will change the size and shape of these rooms (adding a new master closet, removing the current one). So we had to quickly map out where the future walls for the walk-in closet are going to go and where the ceiling fan will be once the current master closet is removed to figure out where to put them. They will look super weird until those changes get made, so this more or less committed us to actually doing all of these projects.

time to finalize the plan for the master suite so we can figure out where to put the skylights

Work Day:
Amazingly, they were able to get everything done in one day. I would have loved to stay home and watch, but had to go to work. Thankfully, the roofing guy took a bunch of pictures for me.

cutting a hole for a new skylight

building a new frame (apparently called a curb)

frame gets covered in roofing material

then they plop the new skylight on top

old nasty bathroom one gets replaced

check out all my roof bubbles!
 
oh - and they solved the original issue, by replacing everything on the sleeping porch

Closing thoughts - 
1) I am consistently disappointed every time we hire a contractor (who caused the original damage that led to all this). I feel like we decide to pay the extra money to have a professional do the work instead of doing it ourselves, because we think that means the work will be guaranteed to be done correctly, to code, and whatever else -- but every time, even well reviewed ones cut corners, create new problems, and leave me thinking I should've just done it myself, or hired the subcontractors directly. Working directly with the roofers on this one made things so much easier, even though we now have to find someone else to do the sheetrock work so we can actually see the skylights from below.

2) We now have quite a few sheetrock projects that are accumulating, between closing in the skylights, patching the sheetrock in the sleeping porch, and closing in the air conditioning vents, and maybe a couple more new ones I'm thinking about. I'm thinking about just hiring out sheetrock work in general, since this is really hard to do ourselves and a team that just does sheetrock is quick and relatively cheap.

3) Light is nice. Already the bathroom seems brighter. I very much look forward to cutting into the bedroom ceiling to see the new skylights to let in more light. This is a major downside of rowhouses - inherently dark.

4) It seems like we have to spend a lot of money just to maintain the house, and get to spend much less on actually making it nicer. I don't know if that's just a general rule for houses or old houses in particular - but I think I previously had the impression that houses were a little more resilient. Since we bought this house, we've spent a lot more money on maintenancy stuff than improvementy stuff - we've totally replaced all the guts of the house (water heater, boiler, pump), and replaced most of the pipes in the walls - all projects that aren't even noticeable.  Thankfully, because of the skylight work, the project was at least half about something that makes the house nicer. I'm ready to start working on projects that make the house feel nicer and more functional.

5) We are now committed to the master suite idea - so we are about to get moving on that project. Since it's on top of the kitchen, which also needs to be done - we're about to start both of those projects at once. It's going to be more complicated to do them together, but ultimately cheaper and better than having to tear things back out down the line - so stay tuned.

Wednesday, July 1, 2015

Three Small Things

Yipes - it's been over two months since my last post. As you can imagine, we rushed to finish the kid's room and then basically stopped everything housework-related. I got a tiny bit of yard work in, and then quickly got both too huge and too hot to do anything else. Then the kid arrived, and we spent a couple weeks recovering and learning to live with a newborn. Three very small things got done around the house.

1. A New Kitchen Light
Do you remember our Tiffany-style kitchen light? It dangled pretty low into the kitchen, which meant that it not only cast shadows around the room, but it reflected a really red/orange color as well. And because it dangled so low into the kitchen, it should be no surprise that it got bumped all the time. At some point, something wacked one of the lights so that it was bent out of position, and one day it started crackling and smoking. We quickly turned it off and went online for a new temporary, cheapish option. I always hated this light and wanted to get rid of it, but we were holding off for the big kitchen renovation that is coming eventually. So, in the short term, we just wanted something cheap, bright and noneventful. We found one, ordered it, and quickly installed it - following the same directions that I described here. The new one is so much brighter and makes the ceiling feel so much taller.

the old Tiffany light created shadows in the kitchen

the new light makes the kitchen so much brighter

new light is much closer to the ceiling and makes the room feel taller

2. A Hallway Runner
After we refinished the upstairs floors, we started noticing tiny little scratches in the hallway. After minimal sleuthing, we determined that the problem was Wally, the kitten who still lives with us. One of his favorite games is to suddenly bolt across a room at full speed and to gallop up and down the hallway. Not only does this sound like pack of horses running through the house (awesome at 6 am everyday), but it scratches the floors as he goes. So we opted to get a runner to help cut down the noise and protect the floors. We picked one from Macy's and then waited for it to go on sale. Once they started the memorial day sale, we finally ordered it. With a nice little rug pad, it now helps cut down on noise and protects the floor. The color is a bit different than the picture online, but it's close enough.

closeup of the new rug

Wally on the new rug
3. A New Toilet
Tragically, just after we returned from the hospital, a time when everything was completely out of control, we noticed that our upstairs toilet was leaking and running constantly. It seemed that the wax ring had busted, so the toilet water was slowly pouring onto the floor, creating a huge, nasty puddle in the bathroom. So, spouso ran out to the store and picked up a new toilet. The old one was old and inefficient, so we wanted to upgrade it anyway. Switching out a toilet should be a really easy job, except that we still have galvanized pipes upstairs (we upgraded the pipes in the basement, but not the rest of the house). He easily removed the old toilet, but had to work hard to bust off the old rusted, iron flange. In the process, quite a bit of the floor tile and substrate was broken loose, so he had to pour in some cement to support the new toilet. Meanwhile, I was completely busy with the new kid, so I didn't help at all (perhaps a good indicator of how difficult house projects will be from now on). The new toilet is much nicer, almost 5x more efficient, and most importantly, not pouring water on the floor. 

nice new toilet

So, that's it lately. Now that we're starting to get a hang of parenthood, I would love to get started on some of the bigger projects around the house.  Stay tuned. 

Wednesday, March 25, 2015

Refinishing the Floors

As soon as we first looked at this house, I knew I wanted to refinish the floors for a couple of reasons.
  1. The floors are currently not stained, which makes them very light and kind of yellow. I prefer a medium-tone, warmer brown color for floors.
  2. The floors used to be a very dark stain that was removed lazily, so you can see bits of the old color in corners, under radiators and in other various places.
  3. The finish has worn off in several places, making the wood really vulnerable to anything that gets spilled on it and an ugly grey color.
  4. There are gouges and scrapes in lots of places.
  5. There are a lot of paint drips (not from me) and other mysterious things stuck to the floors.
looking down at the spindles on the staircase- you can see the old dark stain that was never removed

some deep scratches in the bedroom

the floor looks grey where the finish has worn off
So, we knew we wanted to redo them, but never really made it a priority to get started. Since we're redoing the kid's room now, it seems like a good time to get in there, before a baby arrives. And as long as we're doing one room, we might as well do the whole floor. (Of course we would rather do the whole house, but we're going to cut this project in half both to reduce cost and chaos, and come back for the downstairs once the kitchen is ready. Our house has a fun feature of having pine upstairs and oak downstairs, which was common in the early 1900s, so it's not like the floors would match perfectly anyway.)

I would love to do this project myself. In fact, I have done this before, and it's not that big of a deal. But, my doctors wouldn't clear it, and Spouso didn't want to do it all by himself, so we opted to hire it out instead. (This is one project where you don't save that much by doing it yourself, so we didn't feel too bad contracting it out).

Step 1. Make Backup Plans
Once we got a few estimates, picked a flooring company and started talking through the logistics, we realized that we would be stuck downstairs for a couple days and nights. So we packed some clothes and moved the air mattress downstairs. We figured that we could shower at our neighborhood gym and brush our teeth in the kitchen sink, but had no good options for restrooms. So we installed a toilet in the future half bath. Probably most people don't need to start out their floor refinishing projects by adding toilets to their houses randomly, but this was sort of critical for us-- and it was going to get done eventually anyway.

halfbath is all finished! Let's call it "rustic-chic".

Step 2. Get Everything Out of the Way
We already worked on emptying out the new kid's room, but the rest of the upstairs still had lots of stuff in it. The night before they arrived, we quickly moved all the small stuff, drapes, wall art, and clothes out of the rooms. As much as possible got piled onto the sleeping porch, and the rest got dumped throughout the downstairs. When the floor guys arrived on the first day, they moved the heavy furniture out to the sleeping porch.

Step 3. Scrape and Sand
Then they started sanding down the floors to remove the dirt and grime, old finish, paint drips, scrapes, and whatnot. They hand-scraped the steps, getting at all the old dark stain that had been left behind. They used a big drum sander for the floors, and a smaller rotary sander to get closer to the walls. They hung some plastic sheets to cordon off the area to reduce dust, but it was still a pretty big mess. It was also ridiculously loud, so the cats were not happy.  This was a really long day, but they did a really good job. After they left, we were able to carefully walk on the freshly-sanded floors, but tried hard (but unsuccessfully) to keep the cats off.

stairs getting hand scraped

green room all sanded down

Step 4. Stain
Before they finished sanding on the first day, we tried out stain colors. We knew we wanted a medium, warmish tone, but weren't exactly sure which stain to pick. So we tried 3 samples of MinWax: Provincial, Early American, and Special Walnut. Once they were applied and somewhat dry, we quickly chose Special Walnut. I'm not particularly surprised, since this is just a lighter shade of the stain I usually use on furniture, but it was interesting how different they looked on the floor than in the pamphlet.

stain samples on the floor


stain colors on the website & pamphlet

The second day, after they finished a bit more sanding, they applied the stain. It went on pretty quickly and was immediately gorgeous. Then they left to let it dry overnight. There were slight fumes, but nothing serious, so we slept on the air mattress on the first floor again. Unlike the previous night, we really couldn't walk on the freshly-stained floors, so keeping both us and the cats out became the real trick of the evening. We had to build some serious box walls to keep them out. (Thankfully, we have no shortage of boxes right now).

green room with stain

cat box wall

Step 5. Install New Shoe Molding
Part of the project was to replace the shoe molding, which had to be removed for the sanding process. We wanted the new shoe molding to be painted, not stained, so we worked out a deal with the floor guys to drop off lots of shoe molding the first day. Then I painted it in the garage on the second day, where it hung out to dry. On the third day, they cut the painted shoe molding and installed it. This way, I didn't have to worry about trying to paint the shoe molding in place, where I would almost certainly end up painting the new floors, or having to use painter's tape which I'm not a big fan of anyway.
new shoe molding goes in, but there's a visible gap between it and the baseboards

Step 6. Finish
After they finished with the new shoe molding, they applied a sealant to the floor and then polyurethane. We opted for water-based poly instead of oil-based, because it has fewer fumes and dries faster. They put down 2 coats throughout the day, giving it a couple hours to soak in and dry between layers. Then they left to let it finish drying. The fumes were almost non-existent, but we needed to stay off the floors to let them dry and cure, so we stayed downstairs again and left the windows open upstairs.
green room with poly

piles of cats and all our stuff crammed in the dining room

Step 7. Caulk and Paint the Molding One Last Time
The next morning, I crawled out of the air mattress one last time to finish up the trim. They had already cut and installed the painted shoe molding, but there was a significant gap between the new shoe and the old baseboards. So I caulked the gap, let it dry, and then painted the caulk. Let me tell you how tired of molding I was at this point - now at least the third time I've had to scoot myself around the floor messing with the trim, which does look much better, but still looks lumpy and bumpy in lots of places.
the same corner I've been showing you- all done

Step 8. Move Back
The night of the fourth day, we carefully moved our bed back into our room. The next morning, the team showed up to quickly move the heavy furniture back into place. That night, we moved the last of the small things back where they belonged. In only five days, our house went from normal to disaster zone to better than normal. Now everything is finally back together and looking fantastic.

closeup of the floors - darker, shinier and without junk

The floors look great. I was worried when they initially put the stain down because it seemed a little too dark- but once the finish was dry and it had a nice sheen, I was totally convinced. Everything looks warm and classy. The floors are all uniform, without drips, scratches, bad spots or weirdness, and the trim really pops. We are very happy with all of the rooms, but most excited to finally get to put together the kid's room.

sneak peak of the kid's room- stuff starting to go in


Tuesday, July 15, 2014

Painting the wall above the stairs

We are still waiting on the contractors to finish up some things in the basement bathroom before we can get to work down there. So this weekend, we took a break from the renovation and got another important project taken care of. You may remember that as soon as we moved in, I got to work repainting every room in the house. The downstairs was all painted a lovely pink color that just had to go, so I got to work replacing it with a subtle light grey. I painted every room, but got stuck on the wall over the stairs, which was too tall for my little ladder to reach, even with an extender handle for the roller.

The contractors left a huge two-story ladder in the back yard, presumably for the windows and siding that will go up on the second floor. We decided to borrow it briefly to finish up the painting. The hardest part was maneuvering the massive ladder, which is very heavy and very long, even when not extended. Once in place, it was pretty easy to just climb right up and finish the painting, with the help of a paint brush I duct-taped to a paint stir for extra length. It was miserably hot at the top of the ladder, due to that whole heat-rising thing. I felt pretty proud of myself climbing up to the top, while holding a paint tray and the long roller, and then leaning and bending to hit all the pink spots, while periodically checking the score of the world cup final.

atop my ladder with my extendy paintbrush and tray 
 
Once I finished and cleaned everything up- I noticed that the newly-painted parts are slightly darker than the rest of the wall. I'm hoping that it just needs more time to dry or fade or something, because I'm definitely not repainting everything or getting back on that ladder. Still- it looks better than it used to.

Corner to the left
 

Corner to the right


a view down the stairs
 
 
Total time: 1.5 years
Active time: 2 hours

Tuesday, December 17, 2013

Holiday Decorations!

Like most of the rest of the country, we got hit hard with wintery mix this weekend and last- so we took advantage of the opportunity to stay inside and get things festived up for the holidays. I went just a little bit overboard in an effort to have something festive in every room. I also took the opportunity to change up some of the wall things.

The entryway has a small arrangement of white candle holders and red ornaments on the piano.


The archway is draped with red berries, leading into the fireplace room.

The Fireplace has some branches and a red ribbon for our Christmas cards. 


Lanterns & Branches in the Dining Room


Candles and Ornaments as a centerpiece in the dining room


A floating candle on cranberries in the kitchen

I wrapped the bannister with live pine roping and lights. 


While I was at it- I decided to finally put up the wedding picture we had signed by our guests. 


To complete the wall- I added two more silver frames with black and white wedding pics. The christmas lights reflect in the frames and look really purty. 

`
more red berries upstairs in the bathroom. 


The wall art that was on the stairs came down to the entryway to brighten it up. 


and last but not least- the tree! 


The tree topper- my stuffed quetzal from Costa Rica, in a gold wire nest.


I've got a couple more things planned- but for now- this is our holiday house.