
First- a quick shout out to the glory of bulbs. I paid like $10 for a bunch of tulips and daffodils, and spent like a half hour putting them in the ground last fall. Then, like magic, they arrived and are awesome. I'm a huge fan and will definitely add more next year. Thank you squirrels- sorry I doubted you.

a bunch of tulips and daffodils in front of the garage

tulips and pansies on the side yard

lots of tulips in the quarter-circle
Next- it's time to add in new shrubs. I'm partial to shrubs because they take minimal work and come back or stay around all year long. If you remember, I tried really hard last year to put in shrubs that would be right for the light, appropriate to our climate, and ensure that something was always blooming.
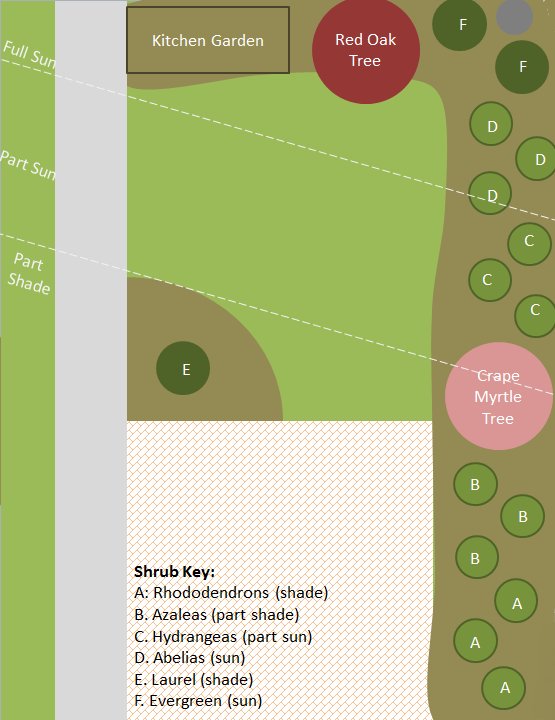
The Original Well-Intentioned Garden Plan from last year
Unfortunately, I underestimated the amount of light we would get (because I was watching in the spring), and I made a number of nice plants turn into toast. Additionally, it appears I under-watered everyone too, probably compounded by a hot summer and our long trip to Thailand. I watered briefly every day, but I should've watered less often with more water. In short, almost every plant suffered and/or died.

The Grim Results from Last Year's Garden Plan
Now that I've figured out the light and the watering dealio, I am ready for my second try. I am moving the living shrubs to better spots, and buying new sun-loving plants for the open spots. I'm also moving the kitchen garden. It did really well last year, but was horribly ugly. In the new spot, it will still get the same light, but be better hidden from view.
While we're at it, I'm adding a tree to give us a little more shade and add some height to the yard. Since we already have a red oak that's amazing in the fall and a crape myrtle that blooms in the summer, I wanted something that would bloom in the spring but stay small enough to fit in the stone quarter-circle. We picked a red bud, which is one of my favorite spring trees; it looks like a normal tree that's been dipped in sprinkles.

New Garden Plan
So, once everything was planned and purchased- we got to work putting it all in the ground. Unfortunately, that meant I had to carefully remove all the still-blooming tulips so that I could breakup the ground, add nicer soil and put in the new guys. Then I carefully added the tulips back, but they don't seem super happy about it. Finally, I mulched everything to help them hold on to water and hopefully do a better job preventing weeds.

New Red Bud Tree in the Quarter Circle

Azaleas and Gardenias along the patio (should smell amazing all summer)

Kitchen garden to the left, New abelias with drapey tulips on the right

more kitchen garden- hard to see in the sunlight.

some fabulous new pots full of herbs

relocated Rhododendrons looking happier

a view along the sidewalk- new purple grasses in the front, then pansies & hostas, then the newly-moved Rhodos in the back
I'll come back later and add in more annuals for color, but hopefully the main landscaping back here is done. I'm crossing my fingers that I got it right this time, and if I water correctly, everyone will live through the summer and for years to come.


