Tuesday, October 31, 2017

Fixing up the Pocket Door

A little side project in the midst of all the big stuff happening around the house - I spent a couple hours this weekend fixing up the pocket door.

remember the pocket door we found in the kitchen? 

If you remember - when they demo'd the kitchen walls, we finally got to see the pocket door that we knew was stuck in the wall. We could only ever see the edge of it, so we had no idea that it was in great shape with an awesome window. We had them move it upstairs to be the new closet door - but knew it needed a little work. The edge had been painted many many times, with lots of colors sloppily painted further on the sides of the door.

door upstairs - with a lot of paint on the edge

So- first thing, I grabbed my heat gun and spent an hour or so removing the paint. Once I'd gotten everything off that way- it was definitely better, but still pretty smudgey.

after the heat gun - still schmootsy.

So then I grabbed some really course sandpaper, and hand scraped it down. Yes- I could've used the power sander which would've been faster, but it was naptime, and I was trying to be quiet. 


after sanding- no more paint, but some discoloration. 

 Then I removed the handle and locking mechanism, so that I could get the remaining paint off of it and the door around it.
lock comes off

After I cleaned it all up, it was clear that the heat gun and sanding had also removed some of the stain, leaving the edge of the door a little lighter than the rest of the door. So I dug around the garage and found a lighter walnut stain, and gave the edge panel a light coat. It didn't sink in very well, but just enough to darken the door up a bit. It's not a perfect match, but I think looks better.

cleaned and stained

Lastly - I gave the whole door a quick coat in polyurethane to protect it. I briefly debated sanding the whole thing down and restaining, but decided to just let it be. The door is old and should look old, I decided. (plus, there was halloween candy to poke at).

stained, protected, and ready to go.

I spent a little time scraping paint off of the edge of the locking mechanism, and then a lot of time trying to put it back together. A spring had come loose, and it took quite a bit of googling to figure out where it should go. Finally, we figured it out - putting the lock back together so that it will actually work.  Now when the door is unlocked, the handle pops out to grab. Then I just slid it back in the door, screwed it in - and called it a day. 

tinkering with the locking mechanism

paint mostly scraped off 

back in the door
 
close up of lock on top and handle on bottom

now when you push the button- the handle pops out

The door looks great and is ready to be used again. Our contractor was initially pretty negative about the idea of reusing old doors - but I'm pretty excited that we saved this one. I have no idea how long it was trapped in the kitchen wall, but now it's ready to be seen and used and hopefully will last another hundred years.

a bit of old character in a sea of new construction

Friday, October 27, 2017

Renovation Update - Sheetrock and a Structural Engineer

So - finishing up our third week of this renovation now. Thankfully, the house is starting to get put back together.  The team made a lot of progress, and the end is starting to feel possibly in sight.

Sheetrock & Electrical
The most exciting development is that they put up all the sheetrock and patched the holes. Not only is it much brighter now, but it feels a lot cleaner and less like a construction site, having all the walls closed up. We can also get a much better sense of the spaces- the bedroom is clearly much bigger. At the same time, the electrician ran around finishing up a bunch of things like recessed lights and switches, so we are no longer walking through dark construction areas trying to find the bathroom sink in the middle of the night.

entryway ceiling patched

kitchen getting closed in

bedroom wall and skylight

another view of the bedroom - so much brighter already!

air conditioning tubes in the corner get covered up

vanity wall in the bathroom- ready for lights and medicine cabinets

Shopping
The endless shopping is hopefully coming to an end. We did a big tile trip and picked up everything we still needed for the kitchen backsplash and shower walls and floor. My dad gave us some leftover marble hex a few years ago, but it wasn't quite enough - so we tried to match it as close as possible for the floor in the old sleeping porch part of the bathroom where the toilet and shower will go (a). For the backsplash in the kitchen and the shower walls  - we picked Sahara Carrara tile which seems a little warmer than the carrara. We got long skinny rectangles for the backsplash (b) and bigger rectangles for the shower (c). We don't have countertops yet, but are hoping that the backsplash can go with lots of options. Lastly - we picked up a stone mosaic for the shower floor - something with lots of space for grout so it won't be slippery, and a darker color so there would be some contrast (d).  

all of the tile

so much heavier than it seems like it should be

The Big Problem
We got a structural engineer to look at the brick issue. Thankfully, it sounds like the solution isn't as awful as I was expecting. They just need to put up a few steel beams to carry the weight. Sounds like the previous contractor we hired did a bad job of putting in a beam over the doorway, which wasn't actually supporting the bricks above, so the weight of the brick wall was pushing down and out - causing the exterior wall to push out. We haven't seen numbers yet - but our contractor said the solution wasn't a big deal, and should only take a couple days to fix. So hopefully they can wrap that up next week and get back on track. 

lots of demo to see the underlying problems

Living in a Renovation
So I feel like this week went a lot better than the previous two, living-wise. I think we've finally sort of figured out how to make this work. Despite the rest of the floor being a disaster - the living room has stayed relatively normal, so that's where we spend all of our awake time. We brought down a little table for eating, which makes things feel pretty normal, even with all the tarps surrounding us. And food-wise, after lots of and lots of takeout and a few failed attempts with the slow-cooker, we've found our groove on the grill. I didn't realize you can just stick pots and pans directly on the grills, which allows for pretty normal cooking. Of course- it's starting to get dark around dinner time now, and chilly, so this isn't a perfect solution and won't work forever - but this week really worked out ok.

a quiet space in the midst of chaos

a repeat dinner of grilled chicken, roasted veggies, and a pot of boiling water for mashed potatoes

Next up -we have a few more shopping trips to make, they've got to fix the big problem, and then I think things can really start coming together. Feeling very optimistic today!

Friday, October 20, 2017

Renovation Update: Progress and some Problems

So - in our second week on the project - the team made a lot of progress, though it's mostly less visible than the huge progress last week with demo.

Framing - 
The last of the framing was finished. The entire long wall in the kitchen is fully framed now - so it will be one level when cabinets go back up.

kitchen wall framed and even

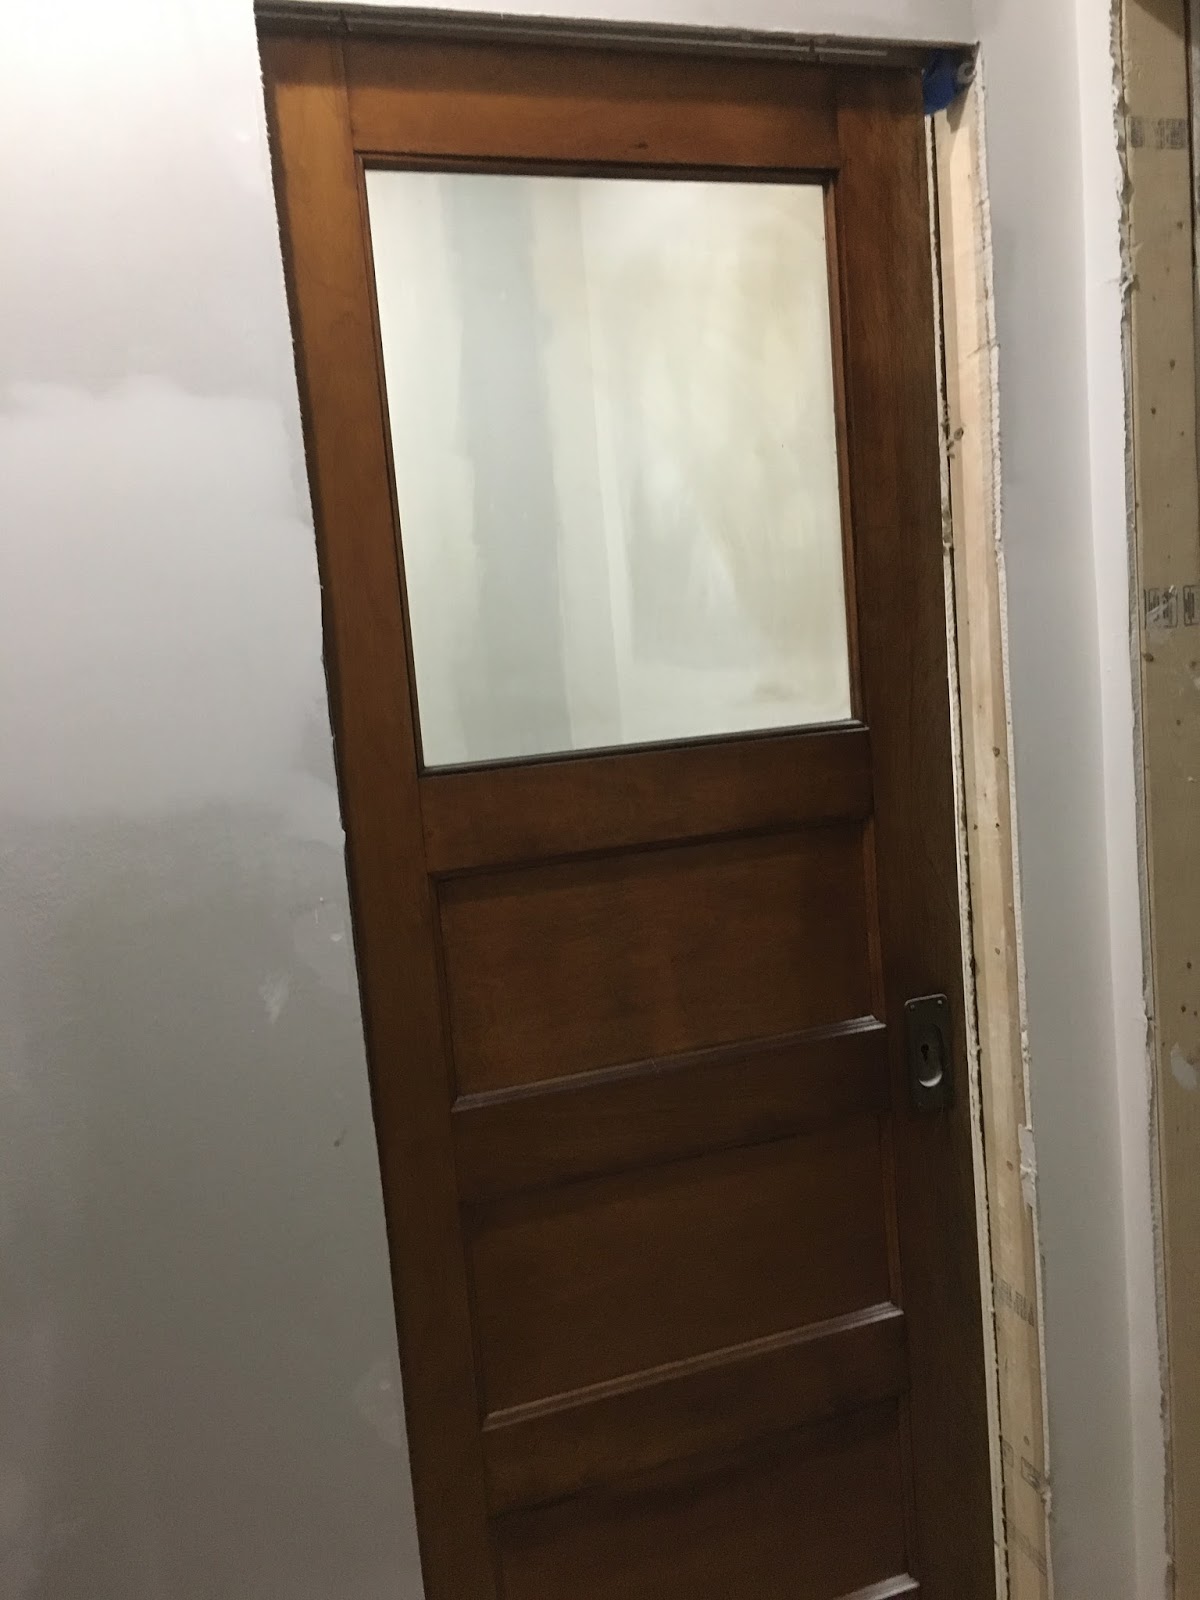
Upstairs, they did some framing and reframing. The two skylights are fully boxed in with the temporary support beams removed. The closet configuration got finalized with the old doorway getting closed over, and a new doorway framed for the linen closet. There was also some reframing and shuffling, as the vanity wall was cut and reframed to fit two medicine cabinets. They had framed a side wall for our shower, but we wanted a full glass pane, so they removed it a framed a base. We're reusing the pocket door we found in the kitchen upstairs in the new closet, so the pocket door frame went in. Also, we're taking the transom window that was in the bedroom door and moving it over to the new bathroom doorway, so they reframed a hole for it to go.

one of the skylights all framed out

kitchen pocket door moves upstairs to the new closet

bathroom door ready for a transom

vanity wall getting reframed for medicine cabinets

old door to the bedroom framed over

Electrical and Plumbing - 
Just as the framing was finishing up, lots of holes were put in it for the new electrical and plumbing lines. For the most part, all the electrical and plumbing lines are now roughed in, and will be finished up later.

water lines for the new shower

lots of electrical going into the kitchen ceiling

water lines and electrical in the kitchen

Shopping - 
For the contractor to know where to rough in all the plumbing and finish the framing, he needed us to finalize a lot of decisions. We had to finally settle the cabinet layout, which involved moving the microwave and switching around a couple things. We needed to pick shower doors so that they could frame the base. Then, we needed to order faucets and lights so they could get the shower valve in the wall, and medicine cabinets and the bathroom vanity so the framing and electrical would be in the right places. So in a whirlwind of 24 hours or so - we made lots of quick decisions and spent several thousand dollars online. This weekend we'll pick up the few remaining things, and we should be done with all the shopping. I'm hoping that I've been thinking about this project for long enough that these decisions were already pretty much decided and won't be regrets in the future, but of course it would have been nice to have a bit more time to shop around.

One Big Problem - 
Things were moving along quickly, so quickly that I should've been more suspicious. Of course - there had to be bad news coming. Turns out - as they started drilling holes for the toilet, they realized that the brick wall was bulging, and seemed to be pulling away from the house. They removed some of the sheetrock in the mudroom to try to find the problem - which may be caused by a bad beam that isn't really supporting the bricks above. Best case scenario - we can replace the beam, but worst case scenario we may need to replace a bunch of the exterior brick that supports the sleeping porch floor. I'm reaching out to structural engineers to figure out what to do. Unfortunately, not much more work can be done until we know what the issue is - so now we wait and I try not to obsess about the worst possible outcomes.
tearing up the mudroom to try to see the problem

Another Problem - 
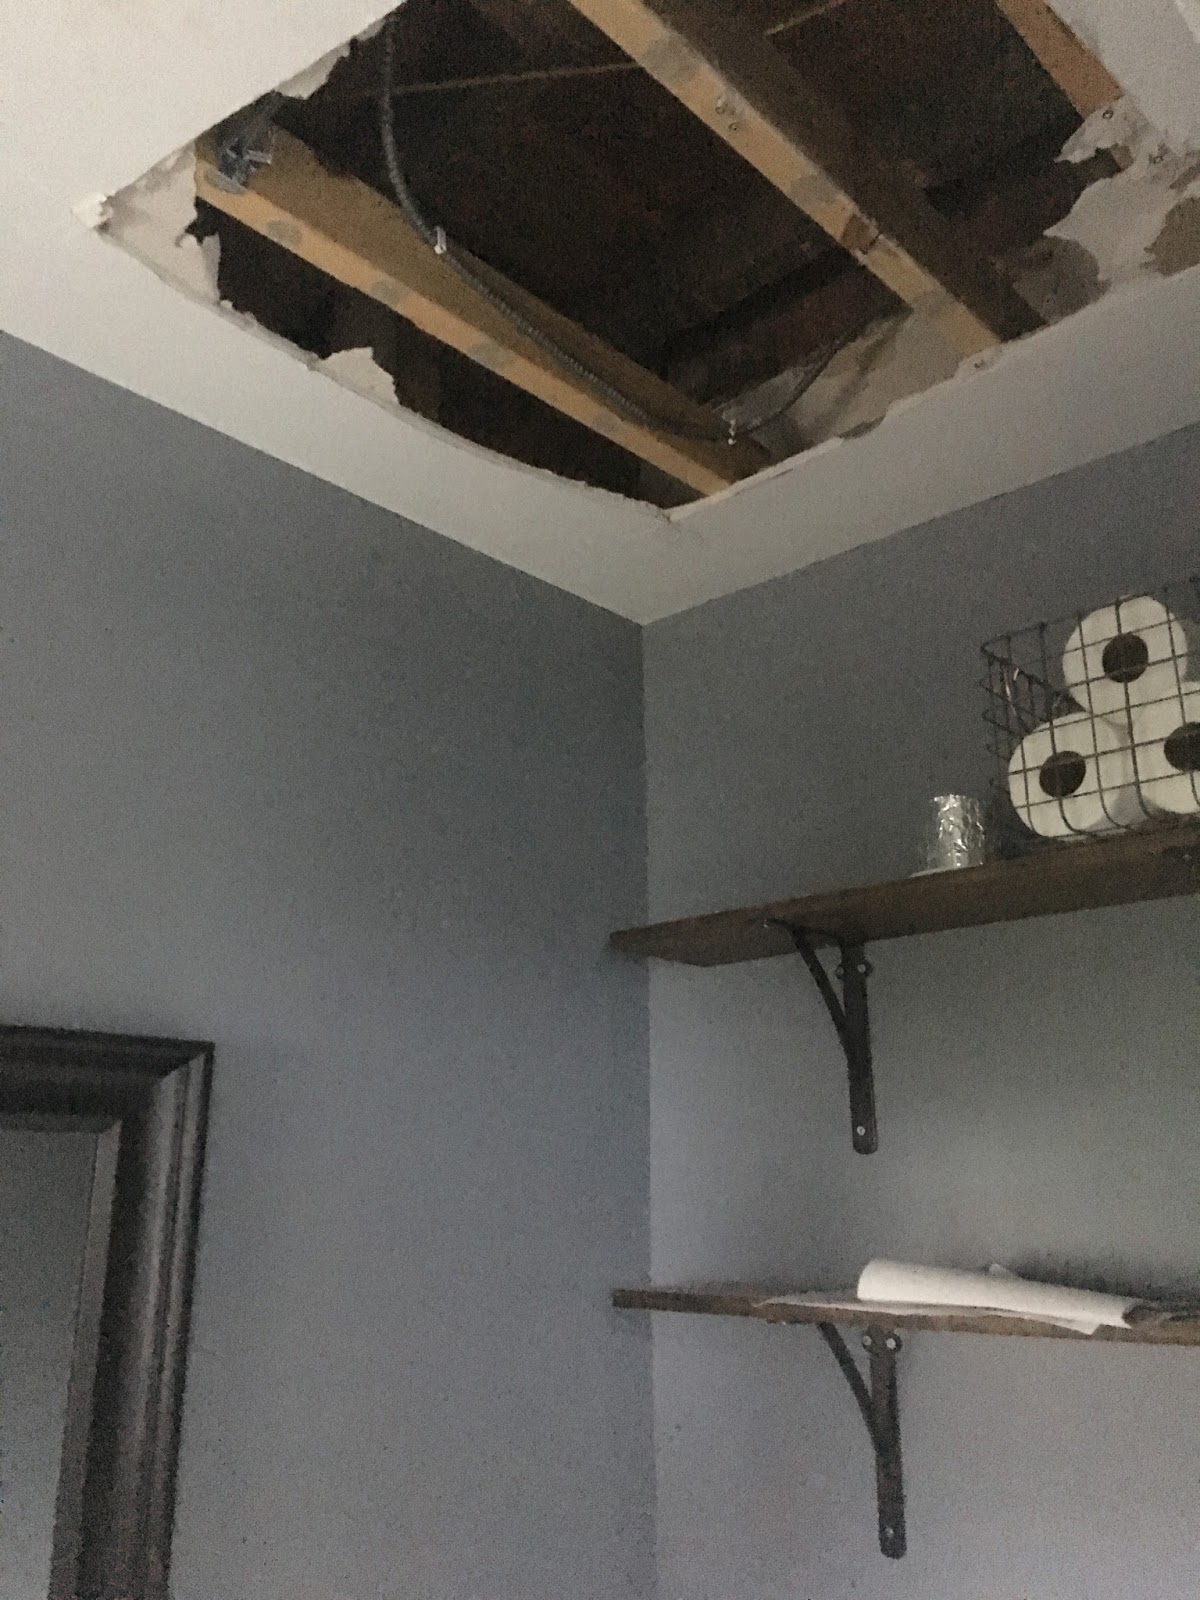
In order to move our stove to the new location, they needed to turn off the gas to the house. When they were done and turned the gas back on, they were unable to access our water heater and boiler to make sure they could relight. The key to the utility room, which is located within our tenant's unit, wasn't working on the door. Sadly, after one cold shower, we realized there was no hot water in the house and decided to break in - damaging the door in the process. So now we have more unplanned repairs to make, in addition to a tenant who's probably not happy with us right now.

Piling On- 
On top of all of this - Spouso happened to be out of town this week on a work trip. My mom came to help out (thanks mom!) which was great, but also meant I got displaced to the couch. Between sleeping poorly, eating very poorly, all the dust, and all the stress of these quick decisions and looming problems - I got sick. I was knocked out for about 48 hours with a miserable cold that I'm just starting to beat back. I keep reminding myself that this is temporary, but I am really ready to get my house back. I am really hoping that things turn around soon - hopefully there won't be more problems, these ones can get fixed quickly and cheaply, and we can start putting the house back together.

So other than the big problem which needs to be addressed, I think we're ready to start closing in walls and floors. I'm hoping this is going to start feeling more like a house again shortly.

Friday, October 13, 2017

Renovation Update: Demo and Framing

empty kitchen - ready for destruction

Prep:
As soon as we handed over our deposit check, a whole team of guys rolled into our house and got to work. They were very diligent about hanging tarps to close off work areas from the rest of the house - though it seems like the entire house is considered a work area. They put a protective barrier on almost all of the floors, and draped the furniture. While we really appreciate their concern for our stuff, the downside is that moving through the house is much more difficult and everything feels like a construction zone. Because we're having a heat wave - the air conditioning is still on, so when the blowers turn on, all the plastic drapes rustle loudly in the wind. Fun.

tarps cover everything in the house

Kitchen:
Once everything was protected, the demo began. They moved our appliances out of the kitchen into the dining room, and then swiftly destroyed the kitchen. The first day, they removed most of the cabinets, the next they took the ceiling, and walls down to the studs (turns out there actually weren't any studs on one wall somehow), and the floor down to the subfloor. Cool surprise  - we knew we had a pocket door in the kitchen wall, but had never seen it because it was stuck in the wall. Once they demo'd and we could finally see it - turns out it has this great window, so we're going to try to move it upstairs to be the new closet door. 

day one -  most cabinets removed

day one - just the sink left behind

day two - everything down to the studs (hello pocket door!)

day two - sink gone! 

The other demo they started was to make room for the electrical and plumbing. They made huge paths for the electrical to run from the front of the house to the kitchen, thoroughly destroying the entryway and fireplace room. Then they made a huge hole in the halfbath and mudroom ceilings to access the new plumbing above. So, basically the entire downstairs now is under construction. 

there goes the halfbath.

i think i have a piano under there. 

Upstairs 
They quickly demo'd the window into a walkway out to the sleeping porch, and demo'd the ceiling below one of the skylights. I was so thrilled to see the skylight - confirming that they were actually installed several months ago. Even as a total mess, the room was immediately nicer with natural light pouring in. They also started framing, closing in the new walk-in closet and the wall that separates the old sleeping porch. They also worked on framing the skylights. Turns out the skylights were installed to fit between the joists in the roof, but not the ceiling joists which are running the opposite direction. So they had to cut the ceiling joist, and build new supports to fix it -aka - I'm really glad I didn't try to do this part myself.

upstairs - new closet getting framed, skylight opened

hello skylight with a ceiling joist in the way. 

In the master bedroom, after a little more discussion on what we wanted the floor plan to be, we decided on a fourth floor option. We totally remove the old, long, awkward closet in order to expand the bedroom and create a wall for furniture - but we keep a small amount of the space as a linen closet that opens into the hallway. As just as soon as we said that - the old closet came down!

upstairs - old bedroom closet and door gone! 

holes in the ceiling - looking for the other skylight

hello other skylight!

It is super exciting to have so much work getting done so quickly. There are some obvious downsides - obviously it's really noisy and super dusty, even with all the tarps. And of course, everything that gets removed is piling up in the backyard, waiting to get carted away. This is the huge pile of debris that waited in the back yard for a couple days before being hauled away and replaced by a new pile of debris.

last view of the old kitchen

Anyway - we're one week in, and I think the demo stage is finishing up. Next up is plumbing and electrical.