Tuesday, October 27, 2015

Introducing the Back Stairs

There is a small set of stairs that lead from the backyard to the back of the house. They are the only way to get out of the house to the backyard and garage, so we use them pretty often. They appear to be made of concrete, covered with bricks, and we assume they are pretty old, but not original.

the stairs by the back door

So- when we first moved into the house nearly 3 years ago, the stairs were ok, but slightly uneven. The bottom two stairs were shorter than the rest, making it a little difficult to walk up without tripping- but it wasn't a huge problem.

Then, during the Big Renovation of 2014, we closed in the back porch in order to extend the back of the house and add the mudroom and halfbath. In that process, they installed the new back door at the top of the stairs so that the floor would be level with the kitchen, which meant lifting it up a bit. So now the top stair was much taller than the middle stairs, which were still taller than the bottom two stairs. This made for a huge tripping hazard.

during the renovation, the top stair is raised

note the unevenness of the stairs

It also meant that there was not a platform at the top of the stairs - you had to step up and inside in one move. Most housing codes require that there is a platform at the top of the steps because it makes things so much easier and safer. It's a pain to get up the steps and through the door in one move- but it's downright dangerous to try to go down and out in one step-- particularly when the first step is a huge one.

no platform- just a huge step down

So, on top of the unevenness of the steps and fact that there is no platform at the top - things got worse over the last two winters. Water was able to get behind and under the bricks and then freeze in the winter- breaking them loose. Now, when you step onto a stair, the bricks rock underneath you and seem to be falling off in big chunks.

big chunks of the stairs are loose

All of this was annoying but liveable, until the kid arrived. [It is amazing how much he has changed everything about my life so far.] So,  I mentioned before that we are in a nanny share, which means that every other week we take our son to the other family's house. On the mornings that I have to take him to their house - I have to get the diaper bag, the bottle bag, him and his car seat outside - (all this weighs at least 1000 pounds and makes me much wider than the door). For extra fun - he's often asleep, so I have to do this quietly and smoothly. Plus, Wally (the small, annoying cat) really wants to go outside but isn't allowed to, so he tries to take this opportunity to dash out between my feet when I open the door- so I have to move quickly.

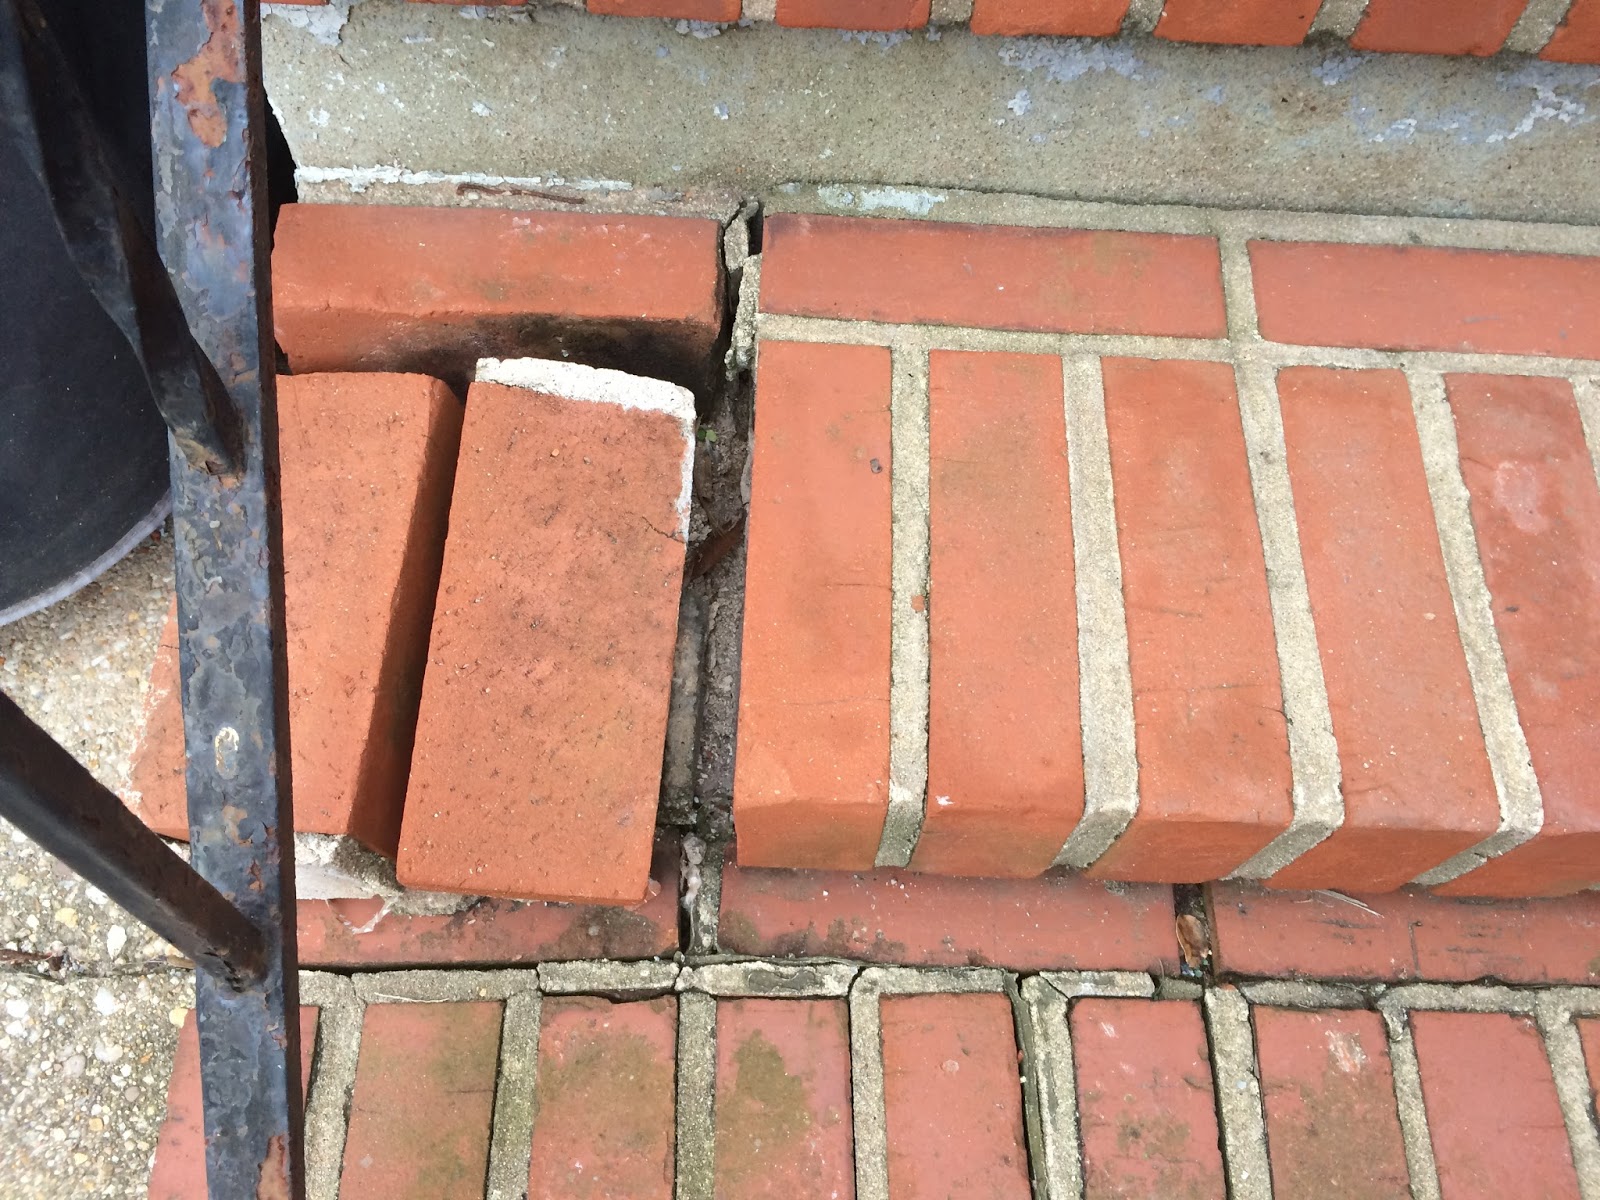
more bricks coming loose

Are you getting a sense of the impending disaster and utter chaos that is my morning? I have not yet tripped or dropped the boy - but I feel certain that it will happen soon. With another winter coming, I'm afraid the last few bricks will come loose- making this absolutely terrifyingly dangerous. Plus, adding coats and gloves to me, plus ice on the steps just makes this a guaranteed accident waiting to happen. Replacing the stairs was previously a really low priority on the to-do list, but it suddenly catapulted itself to number 1. So- we're redoing the stairs.

danger danger!

We really don't want this to be a DIY project, so we're in the process of getting bids from the professionals. We would love to make an iron staircase, which are really common on the fronts of DC homes from the same era - but way too expensive. Instead, we're hoping for a metal staircase, which wouldn't need any upkeep - or possibly a wooden one if metal is too expensive. Stay tuned.

Friday, October 16, 2015

Fall Yard Update

The time has come to clear away the summer annuals and prep the yard for the fall and winter. First, a quick look at what happened over the summer:

1. Hawthorns (yay!)
I had to put in three new shrubs this spring to replace the gardenias that died last winter. The new ones did great and are stronger and healthier than when they were planted. They even bloomed a little.  Clearly a good choice!

the new hawthorns

2. Perennials (boo.)
I planted a few perennials this year that I got cheap from Home Depot, a little later in the spring. None of them did well (maybe it was too late, or too hot, or they just didn't start healthy), but they almost all seem to still be alive. I moved them around in hopes that they'll do better next year if they get a chance to root over the winter.

new perennials looking crappy

3. Vine thing
We built a small trellis this spring and planted a vine thing (the name is totally escaping me right now), which did great. I'm really hoping it comes back next year and continues to fill in along the fence.

vine thing is blooming well in early summer

and keeps growing but stops blooming in late summer

4. Kitchen Garden
As usual, the kitchen garden did great, until it turned into a mess and became disappointing. Two tomato plants completely overwhelmed their little cages and toppled over onto the ground. We hung a string trellis for beans to climb up, but it was taken over by viney weeds, so we never got any beans. There were some eggplants and peppers, but they mostly weren't very impressive. Plan for next year- fewer plants and bigger cages-- less is more.

kitchen garden is overgrown and ugly. 

5. Annuals and Herbs
It was definitely a hot and dry summer, and I didn't do a great job at watering things- so the smallest plants fared pretty poorly this year. The annuals in the quarter-circle and herbs in pots looked great in the beginning of the summer, and then slowly died off as the weather got hotter and drier. Begonias and basil did okay, perhaps they are just heartier and better at the dry weather. Note for next year- buy more hearty stuff (or learn to water the yard).

a field of alyssum and petunias in the quarter circle in early summer

begonias and hostas in early summer

6. Fall Stuff
After clearing away all the dead annuals, I put in the usual mix of pansies and mums for the fall and winter. Then, I finally used a gift certificate from Burpee that I got last Christmas to order some new perennials. I'm hoping that by planting them this fall, they'll have a better chance of rooting and doing well next year.

pansies under the redbud tree

pansies from another angle

new perennials with mums

mums and perennials from a  different angle

mums from prior years still doing well and ready to bloom

7. Fire Pit!
Lastly, we broke down and bought a firepit. We had been talking about it for a while, and decided that since we're definitely staying home more now that there's a bambino- we should have more things to enjoy and entertain in the house. Hopefully it'll help us enjoy the backyard a bit more, since we kind of avoided it all summer due to the heat. Sadly - as soon as we finally decided which one we wanted and ordered it, we found out it was backordered til november.

The Success Stories
For some extra context, let's take a look at how far the yard has come so far just as a reminder that everything I plant doesn't always die. We initially landscaped the yard about 2.5 years ago, prepping it to host our big rehearsal dinner. Each summer and winter since, I've lost some of the original shrubs, but others have rooted, gotten stronger, and grown a lot bigger. Here are some of the success stories of the yard:

abelias

closeup of the abelias- been blooming for like 2 months now

azaleas

arbor vitae

and there's this guy 
(I planted snapdragons last summer, and this summer they started popping up everywhere. I tried to move them to a pot, but then they died. So when this guy sprouted in a crack by the garage door, I left him alone, and he did amazingly well. Kind of drives me crazy when all the annuals I planted died.)

Monday, October 5, 2015

31 Miles in 31 Days

Despite being a fairly consistent runner and generally active person for my adult life, I really slowed down during pregnancy for obvious reasons. By the end, I was massive and mostly sedentary, and really anxious to get moving again. So, when I was about 40 weeks pregnant, I boldly signed myself up to run a 10 mile race this October, thinking it would be a great opportunity to get back in shape. Based on the rule of thumb that you need one week to train for every mile you want to race (which has worked pretty well for me in the past) - I had plenty of time.

However - I didn't have much luck exercising during maternity leave. When I got back to work, I was really excited to get moving again, though I was now behind schedule for the race. I started walking at least 10,000 steps a day (huge improvement over the average 4,000 steps a day during maternity leave). I started going to the gym and ran several times, but just couldn't get back to my normal speed and really couldn't add additional distance like I could in the past. I was so winded and exhausted by everything. Clearly, training this time would be a lot harder than in the past because I had a whole lot more work to do.

So, sadly, I decided to give up on the 10 miler because it was just way too ambitious. I am still fighting to get back in shape, and generally do better with a goal or thing to train for. So, here's my new plan-- I'm going to run 31 miles in 31 days (aka, October). [Several years ago, I set the goal of running 100 miles in a month and almost did it (knee pain at the end grounded me)]. I think this will be a more reasonable but still ambitious goal, that should help me gain the strength and rebuild the muscles I lost during pregnancy.

October is an excellent month for running - which is why all the big races happen now. It's cooler but not cold, turning leaves give you something to look at, and the approaching winter makes you want to soak up every minute outside. Plus, I'm already having visions of Thanksgiving pies and Christmas cookies- so now's the time to get moving. To hit an average of 1 mile per day, my plan is to run 2 or 3 miles several days during the week, so that I don't have to run on the weekends. Since the baby isn't old enough for a running stroller yet, it's kind of difficult to run on the weekends.

DC is a fantastic city for running

If I lose weight - great. If I get faster - great. But my primary goal here is to get stronger and start feeling more like my running spirit animal -- the gazelle-- and less like my current spirit animal - the hungry hungry hippo.  [Sidenote - I'm focusing on getting in shape to be stronger and healthier - but baby weight sucks, so it would be nice if I could lose some of that too.]

fantastic day for an afternoon jog

Today is the 5th day of the month, and I'm currently 3 miles done. A little behind schedule, but totally feeling optimistic and on track. Feeling good about this goal - will check in soon with progress.

Thursday, October 1, 2015

Babyproofing

So - maternity leave was mostly pretty slow and uneventful, house-wise. There was not a lot of time to get anything done on the many, many house projects that I want to work on. However- in the past month we did rather frantically end up making a lot of changes to the house.

You see, finding day care in DC is really hard to do. As soon as I knew I was pregnant, I signed up for the waitlists for 5 different day cares in the area. We paid our waitlisting fees and waited patiently, hoping that by the time maternity leave was over, we would have a spot somewhere. As the end of my leave approached, I reached out to all the daycares to find out where we stood and discovered that we didn't have a chance of getting into any of them. At best, we may be able to get into one in a couple years, and at worst, we managed to move backwards on a list from 150th to 175th.

So, we frantically started researching other childcare options and found a nannyshare that was available with a family in our neighborhood. The great news was that a good nanny would watch our son, starting exactly when we needed her, at a much more convenient location. The bad news was that a 1.5 year old would now also be staying in our house every other week, which was chockfull of baby death traps everywhere we looked. Since our son is only starting to roll over and months away from being really mobile, we hadn't even thought about baby proofing. The other kid though, is running around and great at getting into trouble- so we needed to babyproof asap.

Step 1. Remove the Breakables
There were two bookcases full of breakables - one of our fancy crystal and stuff in the living room and one of our liquor and glasses in the fireplace room. The alcohol got moved into the dining room buffet so its bookcase could go back upstairs to hold books in the new office. The other got moved up to the green room, replacing the console table that was a bad fit up there anyway.

The old liquor cabinet in the fireplace room

new empty wall in the fireplace room- perfect for a basket of toys

old bookcase from the living room moves up to the green room

Step 2. Remove the Deathtrap Shelving Units
After the Great Renovation last year, we got two metal shelving units to replace the walk-in pantry that we lost. One was full of small appliances in the dining room, the other full of food in the kitchen. Both were hideous and totally dangerous for a small child who could pull them over and crush himself. I took all the small appliances off the one unit and moved it down to the basement, where I joined it with a third shelving unit into a mega-double-shelf, to help better organize the stuff being stored down there. The other got moved into the mudroom, where it can be locked away from the kid by the old exterior door.

Old Death Trap #1 - pantry in the kitchen

new well-organized pantry in the mudroom 
(still a deathtrap, but safely behind a lockable door)

Old Death Trap #2 - small appliances in the dining room

new mega double shelving unit in the basement

new safe and empty corner of the dining room

Step 3. Get new Cabinets
To hold all the small appliances that now had no home, we picked up some cheap white cabinets and a countertop from Home Depot. All the appliances fit easily into the new storage space, plus we get two new big drawers for utensils and stuff. We were desperately short on counter space before, so even a crappy counter is a huge step up. Even though the kitchen is getting steadily less attractive at every turn, this is a big improvement for storage and functionality. Plus it lets us test-drive this layout before buying real cabinets in the future kitchen renovation. The old table that was in this spot got moved out to the garage to help organize the workbench area.

ugly new cabinets with lots of counter space and storage

Step 4. Add gates, outlet protectors and cabinet locks
After some minimal research on Amazon, we ordered the classic baby proofing gear - baby gates for the stairs, little plastic plugs for all the electrical outlets, and magnetic locks for the kitchen cabinets.

Wally demonstrates the cat door in the baby gate


Step 5. Build Shelves in the Laundry Closet
I finally put up some basic wooden shelves to get all the laundry supplies up off the floor. This has been on the to-do list since the new laundry closet was built, but we couldn't seem to get it done.


new shelves keep detergents off the floor and out of reach for short people

Step 6. Rearrange the Living Room
Once the old bookcase full of breakables was removed from the living room, we needed to rearrange the remaining furniture. We angled the short couch so that it blocks the radiator (a future hazard once the weather gets colder), which also creates a good place to stash toys out of sight. We also moved the old coffee table to the side of the long couch in the newly created space where the old bookcase was. It has hard metal corners that we don't want the kid running into. On the one hand, the new layout is more open and great for playing, and makes it easier to get to the windows. On the other hand, we no longer have a coffee table, so it's much harder to eat dinner in front of the tv. We seem to have accidentally forced ourselves to start eating at the dining room table like real adults.

the old living room layout with breakables in the corner and a dangerous coffee table

new living room layout is more spacious and less dangerous

the old coffee table becomes a side table

Step 7. Mount the TV
Then we ordered a support to mount the tv to the wall so that it can't be pulled over. Once it was on the wall, we no longer needed the massive tv stand under it, and switched it out for a new much smaller console table that is similar to the side table. We then used a furniture strap thing to attach the console table to the wall, so it can't be pulled over either. The trick here was figuring out how to hide all the misc cables and wires, which were totally visible through the new sleek, glass table. I spent some time bundling and tying each of the wires into a smallish mass that I hide behind the cable box. 

old tv stand is massive and dangerous

new mounted tv over much smaller table

Step 8. New Wall Art
After a lot of time staring at our horrible couches and rug that I never liked, I was feeling pretty annoyed with the living room. We can't afford to buy all new furniture, so I bought a new watercolor for the wall instead (consolation prize!) 

the new watercolor classes up the joint

So, not exactly a renovation project, but a bunch of stuff got moved around and improved. We would've had to do all this eventually once our son is mobile anyway, so it was all time well-spent. We also managed to get rid of several pieces of furniture, like the old tv stand in the living room and the red console table in the green room. They are moving on to a new home, while we are slowly making progress on my goal to get rid of all the temporary and flimsy furniture we bought in our gradschool days.