Friday, October 25, 2013

Training for a Marathon- 2 days to go.

We are in the homestretch. The race is in 2 days. There is very little for me to do now, so I thought it would be a good time to recap.

Looking Back:
In general, there are a lot of marathon training plans out there. They all have a few things in common, like long runs on the weekends that increase slowly each week. But there's a lot of variety in the stuff  during the week-- some have you run lots and lots almost every day, others are less intense. I cobbled together a plan with two mid-week short runs and two strength training / stretching days. Even though this is less running than some other plans out there, I still had a really hard time getting them all in. We had a wedding one weekend that threw off the long run. Work has been crazy all month, so I had to miss a few of the midweek runs. Generally, it's really hard / not possible to put your life completely on hold for 5 months for something. I tried to focus and make this my first priority just for the last month and couldn't even do that. I don't know how other people do it. Training was a priority, but not my only priority.

Note the major upswing in October when I clearly started trying harder. 

I did try though. I successfully ran the long runs and at least one mid-week run every week.  I think I have trained better this year than last, but I can't find my tracker from last year to prove it.  Last year I finished in almost exactly 6 hours - my goal this year is 5:30, which is over 1 minute faster for each mile.

I'm disappointed again that I didn't train harder. I wish I could have run all the miles I was supposed to, and I think I also needed to start training earlier. I'm just a slow runner and will never be a contender to actually win one of these things- but I was hoping to get faster as I trained. Instead, the training allowed me to run longer distances over time, but generally at the same average speed. So, I'm still slow. I will not be finishing in 4 hours or likely even 5 hours. Maybe next time (but probably not).

I'm also disappointed I didn't do a better job at strength training. My knee hurts almost every time I run, some days worse than others. I'm worried that it will start hurting early in the race and it will be too painful to manage. I'm also worried that I'm causing long-term damage that I'll regret when I'm 32 and can't go up and down stairs.

Last Minute Prep:

There isn't a whole lot you can do in the final days. It's a lot like the night before your final exam- you either studied and did your homework, or you didn't and you can't make it up now. Over the past few days, we've been doing everything we can to be as healthy as possible.  I made lots of pasta-based meals planned for dinner. I'm taking the leftovers in for lunch, so that everything I eat has been home-cooked and carb-alicious. We're taking a break from all alcohol, and trying to drink 2 liters of water a day to be super hydrated. We're also trying to go to sleep early and be well-rested. We have a few very short runs planned, just to keep the legs moving, but are otherwise taking it very easy.

We have both been reaching out to friends and family for support. Last year, R was my support coordinator- he carried all of my stuff and ran with me for several important sections. Unfortunately, he's running, so I won't have him this year. Instead, we'll both have to mess with the bag check and figure out how to stay warm until the starting bell. We'll both have to carry our own supplies. It looks like his family will be there to cheer us on. I have thankfully lined up my friend and my brother to run again with me. My mom is flying up for the race to run some key parts too. Altogether, I think I can patch them together to cover most of the last 10 miles, which is obviously the harder part when I will start seriously questioning why I'm doing this.

Why am I doing this?
  • I'm looking forward to finishing. I don't want to run this thing, so finishing it is a huge triumph over my own laziness. [Also known as the joy of doing something awful, so that you can enjoy stopping it.] 

  • I'm looking forward to getting my medal. Not only do I not want to do this- most people don't want to do this. Finishing a marathon is very rare. So it's a huge badge of honor to do it. At the Marine Corps Marathon, actual marines in uniform give you your medal at the finish line and solute you. It's pretty intensely awesome and makes me proud.

  • I'm looking forward to the huge burger and fries I'm going to eat at the victory party. We've been really careful about food lately, so junk food has been totally nixed. After the race we get to have burgers and fries a) because we're no longer in training so it's ok and b) because I will have just burned almost 3000 calories. There will also be dessert.

  • I'm looking forward to eating like a normal person again. The plus side of the running is that you burn more calories so you can eat more. The down side is that you have to eat more because you are constantly starving. Every day I would like to eat an entire cow. An entire cow dipped in chocolate. This is, of course, where runners get into trouble and eat more than they can run off, gaining weight, so you have to be really careful.  (I successfully lost 3 pounds. Woot Woot).

  • I'm looking forward to next Sunday, when I don't have to run and don't have to feel bad about it. Running a marathon is really intense, but it's a lot more than a one day thing. For months now I've been training, which means that every Sunday we had to wake up early and during the week after work I had to run. There's a lot of constant guilt (for me) while training, because I always feel like I'm skipping something or being lazy (because I often was).

  • I'm looking forward to getting all of my weekends back. When I did the runs I was supposed to, I felt great, but also exhausted and frustrated because they consumed my weekends. We couldn't do a lot of things on Saturdays (like hiking or staying out late) because it would mess up the Sunday run. On Sunday, we would have to wake up early, prep, run, stretch, shower, and often nap - so that a long run ended up taking over the whole day. We have a lot of house projects I'm anxious to tackle, as well as friends I feel like I haven't gotten to hang out with.

  • I'm looking forward to doing other activities. On the same note as above, running has consumed my ability to do anything else. I am really excited to do other exercise things again that aren't running. We pay for a gym membership that neither of us have used in since we got started. I want to try lots and lots of classes. I want to hike before the fall is completely over. I want to try a barre class and wear all of the yoga clothes I own in a yoga studio (instead of the living room). I want to do things that are slightly more interesting and entertaining than trying to decide which foot comes next.

So- homestretch. Next post will hopefully be my amazing success story. Keep your fingers crossed.


House Tour and the Grand To Do List

Okay, so we are coming up on our one-year anniversary in the house, and it doesn't feel as far along as I'd hoped. In many ways, it still feels like our predecessor's house that we're just staying in, not our house.  To be fair, we did get married this year and go on 2 honeymoons, all of which took a lot of time to plan. We are also training for a marathon, which takes a lot of time and exactly 99% of my energy. But still, I'm a nester and I want my home to feel like it's mine.

Since we moved in, I've painted almost all of the rooms, and we've moved in all the furniture from our previous much smaller, 1-bedroom condo. We focused on the backyard as our first big project, mostly because we planned to have the rehearsal dinner out there (which was spectacular, even though the rest of the house was lame). The other projects I've worked on have all been small and somewhat random, just addressing issues as they popped up (ie, curtains and moths).

Moving forward, I want to be more focused and prepared. I think it would be helpful to have one big list of all of the projects I want to address, so that we can prioritize them and start making progress. I think we both like the idea of completing a room before moving on to the next, as opposed to a more scatter-shot approach. This is not the all-encompassing list that makes these rooms 100% finished- just the bigger issues that need to be addressed. [Obviously, every room is very sparse and desperately needs some accessories and wall art]. As I've already laid out, we have a couple bigger renovations in mind, that will take a few years to complete. For those rooms, we have a phase 1 approach for the short term, and the phase 2 longer-term project that we'll hopefully get to in the next three or four years. For the phase 1 projects and all the other rooms, it would be great to get through this list in one year. So not only do I get to plan (I do so love the planning), but I also get to take this opportunity to introduce you to all of the rooms and catch you up on all the work I've done since we moved in (and before I started the blog). [Sidenote, this list excludes the basement, which is a project on a separate track that will hopefully start moving shortly.]


Outside

This space has come the furthest since we've moved in. We added the stone walls and lots of plants. We got a new table and chairs, as well as a fantastic grill.


To Do List for the Backyard:
  • Add new shrubs to replace the ones that died
  • Add curtains between neighbor's porch
  • Remove pealing paint on porch 
  • Add an outdoor rug for the back porch area


Downstairs
 
Moving into the house, here's the general layout of the first floor:
 

For most of the downstairs, I painted everything light gray, which was a huge improvement over the peachy-pink that was there before. We have a few projects for the whole floor, with the general purpose of brightening it up. There's very little natural light, so everything feels dark and dreary. I know there are a lot of strong opinions on painting trim, but I hate the dark wood. R feels differently, so we're still working on this one.

To Do List for the Downstairs:
  • Refinish floors a nice medium brown color
  • Add recessed lights
  • Paint Trim (?)


Entryway
 
This space, including the area between the two front doors, isn't very functional. It's often where all the mail and shoes and stuff pile up. So far, all I've done is remove the old wallpaper and repaint. Plus we added a piano!


To Do List for the Entryway:
  • Add a bench
  • Add coat hooks
  • Replace tile by door
  • Replace security door
  • Add a rug
  • Replace overhead light
  • Add something to sort mail
 
 
Living Room
 
This is our only living room, so we actually spend a lot of time living in this room. The beige couches and beige rug were transplanted from the old apartment. They didn't look great there either, but here they create an overwhelming ambiance of blah. While we don't have any reno projects for this room, we desperately need some new furniture to make this room a little more functional and a lot more attractive.
 

To Do List for the Living Room:
  • Get a bigger TV
  • Replace couches
  • Replace rug
  • Replace coffee table
  • Add more seating


Fireplace Room
 
This space is our token odd room. (I think lots of houses, and old ones in particular, have at least one room that just has a weird layout with no obvious purpose. This is ours). It's small. There's no good wall space for seating or furniture. We don't even know if the fireplace works. The only thing we've done (other than paint) is to add a rug, which helped hugely in cutting down on echoes, but totally clashes with the fireplace.


To Do List for the Fireplace Room:
  • Have fireplace inspected and cleaned
  • Reface fireplace and hearth with tile
  • Add screen and log holder thing
  • Paint mantel (?)
  • Replace overhead light
  • Add liquor cabinet
  • Add seating
  • Finish painting the staircase
  • Refinish the bannister


Dining Room
 
All I've done in this room, again, is to paint. Unlike the rest of the downstairs, I used a darker grey in this room to create a cozier feel. The furniture is absurd.
To Do List for Dining Room:
  • Get a bigger table
  • Get comfy dining chairs
  • Add a buffet
  • New Rug
  • Replace Chandelier
  • Add curtains
  • Open window into a door onto the back porch
 
 
Kitchen
 
Unlike the rest of the house, we haven't done anything in here. The walls are covered in a painted, textured wallpaper, so I didn't want to add another coat of paint over it, but haven't bothered to try removing it yet. The trim is bright yellow- this picture is true to color (yah- that's neon yellow if you were wondering). The cabinets are all nice with granite counters, and were probably part of an expensive renovation not too long ago. Unfortunately, there is almost no counter space, and only one drawer, so it's really not functional. Plus, it just reeks of the 90s. I would love a bright, white kitchen with more working space and a peninsula that allows guests to talk without being underfoot. This is a room that needs some short term fixes while we wait for the bigger renovation, somewhere down the line.


To Do List for the Kitchen:

Phase 1:
  • Paint cabinets
  • Replace overhead light
  • Paint trim
  • Remove wallpaper and repaint walls
  • Add temporary counterspace


Phase 2 (maybe in 2 years):
  • Create mudroom off back door
  • Add half bath to pantry
  • Open wall to dining room
  • Add peninsula
  • Replace all cabinets and counters
  • Add backsplash


Upstairs

So, moving upstairs. The layout again, looks like this (not including the sleeping porch running along the top):
 

To Do List for all of Upstairs:
  • Add lights
  • Repaint trim
  • Refinish Floors

Office

The office is one of the few rooms that's gotten some love so far, with the new bookcase and curtains. It also got a nice coat of paint, which replaced one very dark blue wall and three very white walls.
 

To Do List for the Office:
  • Add a rug
  • Get a real desk
  • Make another bookcase


Green Room

The Green Room (Guest Room) has also gotten a lot of love since we moved in and is probably the nicest room in the house. With new green paint to replace the one black wall and three white walls (I don't understand the accent wall thing, but our predecessor loved it), the room has a really nice relaxing feel in the morning light. It's all well furnished, with a mattress (no headboard), two nightstands, a dresser and a mirror, in addition to some fabulous curtains.   


To Do List for the Green Room:
  • Get a rug
  • Add a tv and side table
  • Get a headboard
 
 
Bathroom
 
Like the kitchen, the bathroom hasn't gotten any attention since we moved in because it also has painted wallpaper. This is another room that needs some short term fixes before we can get to the bigger renovation.
 
To Do List for the Bathroom:
 
 
Phase 1:
  • Replace sink with a new cabinet
  • Replace toilet seat (it's faux mother of pearl).
  • Replace mirror and vanity lights
  • Clean & scrape skylight
  • Remove wallpaper and repaint

Phase 2 (maybe 4 years):
  • Remove wall tile
 
 
Master Bedroom
 
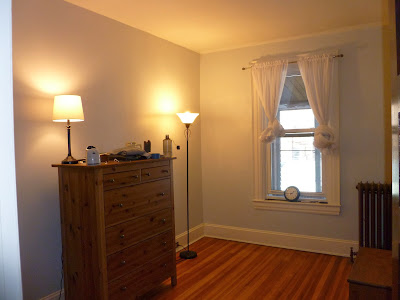
I think this is just the saddest room we have. When we moved in, the master bedroom had four white walls. Combined with our white sheets, it was the most boring room I had ever experienced, so I quickly picked a paint color and threw it up on the walls. We wanted a smoky blue color, but it came out kind of baby blue. It's also a darker room that doesn't get any direct light, which contributes to the general sadness.
 
When we moved in, we quickly bought a new mattress to accommodate our first house guest, but we didn't get anything else. That means that whenever someone comes to visit, or when we moved temporarily into the Green Room to sleep, we have to move the nightstands, lamps and bedding from the master. [Note pilfered nightstand & lamp in pic below]. So really, this room is nothing more than a mattress with some sheets. Since it's our master bedroom and the place we spend the most of our time in the house, it should be the best. It definitely needs some short term help, but we also have a bigger renovation planned for the future.
 

To Do List for Master Bedroom:
 
 
Phase 1:
  • Get bedding
  • Get nightstands and lamps
  • Make curtains
  • Add rug
  • Make headboard
 
 
Phase 2 (maybe 3 years):
  • Remove closet
  • Close in part of sleeping porch and open into room
  • Add skylight
  • Add comfy chair


R's Room

This room got another coat of the light blue paint, but otherwise nothing. R uses it to get dressed, which is a little disturbing in the morning, while I'm still asleep. When the bedroom renovation occurs, this room will be dramatically converted to a large walk-in closet and master bath. In the short term, it would be great to add some features to cut down on the noise and light when he gets ready.


To Do List for R's Room:

Phase 1:
  • Get a rug
  • Add a curtain to separate from master bedroom.


Phase 2 (maybe 3 years):
  • Add the new washer/dryer
  • Create a walk-in closet
  • Close in half of sleeping porch and open into room
  • Add a master bath
  • Add a skylight


So that's the house. Now that we've got everything down, it's a little easier to prioritize our next projects and track the progress. First up is the dining room, which has some major progress coming very shortly. Next will be the master bedroom, because everyone should have a bedroom that makes them happy. Then we'll tackle the fireplace room in time for the holidays. Stay tuned.


Tuesday, October 22, 2013

Moths!!!!

So, after I fixed up my closet, I was pretty happy with it. It was smallish but functional, so I had no real complaints. That is, until I started noticing things like this:

 Arrrrggg!!!
 
 
From the top right going clockwise- this is my grey pencil skirt, my best navy pinstripe skirt, my grey jacket sleeve and my black skirt (aka, one piece of each of my good suits).
 
 
[Sidenote- I never noticed anything in the morning. It was only after I got to work, often during a meeting, that I would notice a hole. The best one was when I noticed a string of holes down the front of my skirt while I was in an interview. It looked like I had spilled food all over myself. In your face, moths-- I got the job anyway!]
 
 
Ok, so after some googling, I determined that I definitely have a moth problem, and found a couple good articles for "taking care of them" here and here. Immediately, I moved into full swing Operation Kill the Dirty Little Moths and Save My Clothes!! [Another sidenote, I'm usually not a big insect killer. I generally like to catch and release bugs, or just let them be. But these little demons just destroyed about $1500 worth of suits, which is like 80% of my wardrobe- so the gloves are freaking off.]
 
 
Step 1 - Assess the Damage & Empty the Closet.
I pulled everything out of the closet and inspected it. I found two chewed up work dresses, one chewed sweater, and one pair of pants (basically everything I owned that was made of wool). From what I understand, they eat animal fibers (ie, wool and silk) and they prefer spots that are extra tasty, with food crumbs and whatnot. So I guess it's not surprising that the more I liked a suit, the more I wore it, and the more they chewed. Everything with holes went into a garbage bag. I moved all the rest of my wool to the office, which is well ventilated, bright and sunny, just in case (apparently moths prefer to hide in dark, closed up areas). Everything else got piled up on the bed.


Step 2 - Vacuum and Scrub the Closet.
Once the closet was empty, I vacuumed, and left it open all day with the light on. I washed all the walls and shelves with warm soapy water and let them dry overnight. Then I put in a moth trap and left the closet empty all weekend.
 

Step 3 - Wash everything.
Everything that can be, got thrown in the wash machine. The remaining pieces of my suits went to the drycleaners. Thankfully, I don't really have that many pieces left, so it wasn't super expensive. Yay, silver cloud.
 
 
Step 4 - Partially move back in.
Once everything was out of the closet and clean, it seemed like a good opportunity to do some editing and paring down. I tried on everything, and anything that didn't fit or doesn't get worn is going to  Goodwill. I ran to Target to get a few bins and rehung the sweater thing, so that everything that is staying is well organized and easy to get to. This way, it should be easier to keep an eye on everything. 
 

My empty, well organized closet. Triangle on top shelf is the new moth trap.


Step 5 - Go shopping.
Seriously. I have nothing to wear.  
 
 
So I'm left wondering- why did this happen? Is it because I recently removed the cedar partition? The walls are still all cedar, but nothing really smells cedary, so I don't think it was working anyway.  I didn't have any moth problems at the old house. Were the moths just waiting quietly for me in the new closet, or did I bring in something infested? Does the fact that all of the closets in this house are lined in cedar imply that this house had a previous problem?


I have never had a moth problem before, but I always kind of assumed it was like having any other pest-- annoying, but not really problematic. Oh no. This was an extraordinarily expensive, poorly timed disaster. I will be ever vigilant from here on out. Fingers crossed they don't come back.
 
 
Total time = 4 days
Total cost = $1500 of ruined clothes, $50 for dry cleaning, $10 for moth traps.

Wednesday, October 16, 2013

Improving My Closet Layout

When we moved in to our four bedroom house, we decided that we wanted all of the rooms to get used. We didn't like the idea of any of our new square feet being wasted. Therefore, in addition to our office and master bedroom where we would sleep, we would each have a dressing room to keep our clothes. I picked the guest room, (aka the green room), because it got great natural light. R picked the back room because it had a huge closet. [Huge mistake on my part.]

Looking at this picture makes me realize I picked the worst closet. What was I thinking?


As soon as I started unpacking, I realized that the closet didn't work at all. My closet wasn't really small actually, it was just horribly laid out. It was divided in half with a large wooden divider with doors, presumably to separate clothes that are out of season. The front space was really small and cramped, and it was hard to get to the back space. This seemed like a closet that would be an awesome place for hide and seek, but not a great place to store clothes. After weighing those two important priorities, I decided to make it more functional at the clothes holding.

Starting point with open door to back storage area.
 
 
After one day too many of being frustrated and not being able to fit my clothes in the front area- I grabbed a crow bar and a hammer and ripped out the central divider. It left behind a huge area, with a single hanging bar (about eye level) and a shelf across the top (roughly 7-8 feet up). 
 
 
Open and spacious- not super functional.
 
 
So I boldly drove to home depot to buy a single board that was 1 x 18 wide, and 6 feet long. I also got two boards that were 1 x 2 to form the supports. I cut the support boards to the width of the closet and the depth of the shelf, then screwed them up to the wall. Then, I cut the big board down to the width of the closet, painted it, and rested it on the supports.
 
One important lesson here- this is a two man job. It's important to get everything level before they get attached. I couldn't quite hold the level and the boards and the drill at the same time, so I just eyeballed it. Now, it's plain to see that the new shelf is higher on the right than the left. Oops. Next time. 
 
New Shelf!
 
 
This has been the status of my closet for a while now, and it's working pretty well. I would just like to add some additional bins for sweaters. Otherwise good!
 
 
Total time=  2 days
Total cost = $20 for lumber


Monday, October 14, 2013

Making Sheer Curtains

I started making curtains for the front of the house over the summer, but ran out of time before the honeymoon, and left them hanging (literally). I just got around to finishing them up this week.

Where we last left the curtains- with the old dusty blinds and the cheap white curtain rod.

Step 1 - Take Down Old Nasty Hardware. I have discovered that a solid rule of demolition is that whoever had the house before you did not install things in a normal way. They either a) barely attached the thing, so it's a true miracle the house hasn't collapsed yet or b) supported, reinforced, glued, nailed and bolted it in so securely, that the thing can never be removed. My curtain hardware was the later- those suckers were in with 3 inch screws that were also glued in place (the blinds maybe weighed 3 pounds). Taking them down took more effort and strength than any other part of this project, and made me a little worried about bigger projects ahead.

Holes and pealing paint after the old hardware is removed

Step 2 - Patch and Paint Windows. Because the original hardware was installed so super-duper well, removing it left some pretty big holes in the window frame, so I had to add an unexpected step by patching and painting the windows before moving on. The nice part is that the windows are now a fresher, brighter color, and this gave us a good opportunity to swing by our local Octoberfest celebration while the paint dried.


Patched and Freshly Painted

Step 3 - Install New Fabulous Curtain Rods. I got some help with this part from R, while I took a break. The new brackets went up, then the rods just sit in them. The only trick was the far right rod, which can't fit because the window is squashed up against the wall. We just removed the finial, which seems to work so far.

New hardware for double curtain rods

Step 4 - Measure, Cut and Wash New Fabric.  So if you remember from my last curtain experiment, the pre-washing step is important but risky. I measured the height of the windows from the floor (95 inches) added 5 for hems (+5) and then another 6 for shrinkage and then rounded up, for 110 total. I cut four panels and threw them in the wash. After the wash was done, I had a ratty, tangled mess. Yipes! Clearly my shear fabric was much more delicate than my previous curtain fabric, which didn't have any fraying problems. I carefully pulled the mess out of the washer and let them air dry.

I just rolled the fabric out on the floor next to a locked tape measure.

Step 5 - Iron and Hem on Sides and Top. Once they were dry, I took each panel and trimmed the loose threads. I ironed and pinned a 1 inch hem along the sides and sewed them. Then for the top, I ironed a 1 inch hem, pinned it, then folded it another 3 inches for a pocket for the curtain rod, and sewed it.


1 Inch hems being measured, ironed and pinned

Step 6 - Hang, Pin and Sew Bottoms. Because I wasn't sure how much they would shrink, I opted not to sew the bottom hem until they were hanging. So I put up the new curtains, pinned them so they just brushed the floor, and then sewed and trimmed the final hem along the bottom.


Pinning the curtains so they just touch the floor

Step 7 - Rehang and Bask in New-Found Skillz. Once the final hems were sewn, all I had to do was rehang my fabulous finished curtains. They provide a nice privacy screen while letting in the light. Because they are super light, they billow in the breeze when the window is open, which is just super relaxing. I love my made-to-fit, interesting fabric curtains that actually touch the floor.


A quick reminder of how far this room has come from move-in day-- before (above) and after (below).


Total Time = 7 days
Active Time = 10 hours
Total Cost = $90 for sheer fabric and curtain rods

Wednesday, October 2, 2013

Yard Update

Now that summer has come to an end, I thought it would be helpful to do a quick review of what worked and what didn't in the yard.

If you remember from my landscape post - I tried really hard to plan out the yard perfectly, so that everything would thrive and something would always be blooming. All plants are defined as being preferring full sun (more than 6 hours of direct sun), partial sun (4 -6 hours of direct), partial shade (2-4 hours) or shade (less than 2). So I watched the sun, and mapped out how much light each area was getting. I picked only plants that are meant for our zone, and bought nice ones at a local nursery so they would start out healthy. Then I paired the plants with the right parts of the yard according to how much light they get.


I learned two very important lessons here:
  1. Assume there will be more sunlight than you think. As the seasons progress, an area will get more sunlight in the summer than it does in the winter and spring. Therefore, if you measure how much light an area gets in the spring, remember that it will get more in the summer.
  2. All hours of sunlight are not equal. If a plant says it wants partial shade or partial sun, it really means it wants morning sun, not afternoon sun.

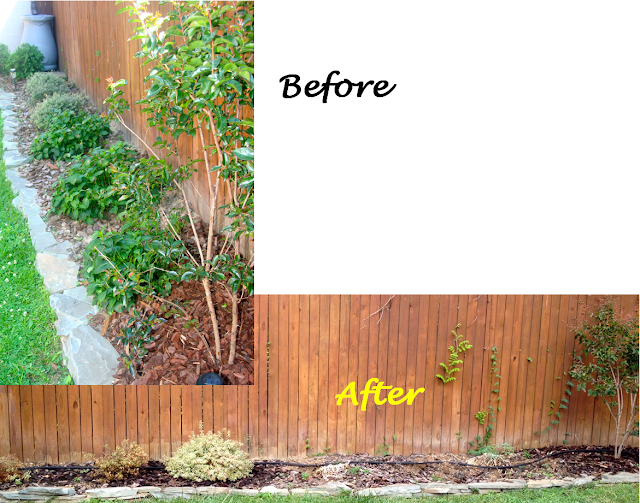
Because I was not aware or remembering these important rules, quite a few of my plants are total toast. I tried to move the hydrangeas out front to save them, but all that did was prolong their death and move it to a location where everyone could watch. (Sorry plants- I meant well.). I lost all but one of the abelias, (notice the toast to the left of the one healthy-looking green blob below). Next year I will only put in things that demand full, baking sun.


The azaleas and rhododendrons did fine- and doubled in size. They were a little more protected from the sun than the others. I'm hoping they and the new crepe myrtle tree are through the danger zone and will be strong and happy from here on out.


The quarter circle did great and completely filled in. It played a fun game where the yellow portulaca flowers would open in the morning, then they would close so the red flowers could open in the afternoon.


The kitchen yard also did really well. Midway into the summer, things were looking good, but the squash plant started overtaking the yard and walkway. I tried to move it, which of course killed it, but allowed the remaining tomato plants to explode. The after picture below is just one tomato and eggplant plant- both still going strong. [Sidenote on kitchen yards, while it's awesome to have a fresh and constant supply of homegrown veggies- kitchen yards are kind of horrible looking. Need a plan B next year so that I don't have to stare at this scraggly mess.]


I just put in some nice fall things to stay pretty through the winter, and lots and lots of bulbs that should be spectacular when spring rolls around!

new pansies around my scorched mountain laurel. 


Until I get new shrubs, I put some annuals to fill in the scorched earth. [cat photo bomb.] 

pansies, mums and cabbage!

And- a fun discovery. this is a pirate pansy that got free and decided to grow in a crack. It makes me feel like an excellent gardener when I pay good money for plants, put them in good soil and water them carefully but they die, while other plants grow like weeds and flower in the cracks of my sidewalk.