Sunday, May 18, 2014

Our Grandfathers' Things

This is not one of my blog topics that I had been planning and prepping for, but I thought it would still be nice to share.

Earlier this year, my grandfather passed away. He was a cowboy and a world traveler and a really nice guy. He and my grandmother lived in a house that was filled to the brim with items they had collected from their travels over the years. It wasn't safe for her to live there by herself, so the family gathered to empty out the house. It was very important to my grandmother that as much as possible of her many things would stay in the family.

Just this month, R's grandfather made the bold and courageous decision to leave his house of over 50 years to move into a new apartment in a senior community. The house he had been living in is where he raised his children, so it was full of all the mementos and artifacts of their life there.

In both cases, the houses were chock-full of stuff, and our parents did the heavy lifting of sorting through the trash and donatables. Our job was to sort through the things of value to pull out heirlooms we wanted to keep in the family and mementos that would remind us of our loved ones. We tried hard to only pick the things we really liked and would want to keep forever. Some items were great as-is, and a few others needed a little work.

My Grandfather's Things:
An elephant from one of their trips in the living room


A massive belt buckle turned object of art in the fireplace room (the white thing)


A bolo tie turned into a necklace


yay new necklace!


R's Grandpop's Things:

R's mother's step stool in the pantry
(with her name painted on the bottom in excellent 4th-grade cursive handwriting)


The big project: an old window that needed some love. 

I scraped off all the old pealing paint and loose caulk, and sanded


I recaulked so the panes were held in safely


Then I repainted both sides

I added little rings on both sides of the back


all done and looking fabulous on the living room wall


So, this wasn't exactly a project we were planning on, but it turned out nicely. Several of our rooms got a little upgrade, making them a bit more interesting and adding reminders of our grandparents throughout the house.

And- on the topic of family and multiple generations, our not-so-small-anymore kitten, Wally, has some big news this week. At 8 months old now, it was time for Wally to get snipped. Spaying and neutering our pets is an important thing to do to prevent more freezing little kittens in alleys, but I'm not feeling great about it today. The poor little guy is just miserable. We're crossing our fingers that he bounces back quickly and will again be the energetic little monster we've grown to tolerate.

Miserable Wally lounges sadly in his cone.

It's a little early for father's day- but seems like a good time to give a shout-out to the men in my life. Woot-Woot. 

Friday, May 9, 2014

Renovation Update - Let's get started!

I mentioned over two months ago that our permits were finally approved to start our renovation. We reached out to several contractors to get estimates. Like every other part of this project to-date - this step also took way longer than expected. Some contractors wouldn't return our calls, some would come but never send the estimate. Some sent estimates for only part of the work. We found one we really liked, but even with them it took time to finalize the scope of work and get it all ready. So, now that we've done that, we are finally ready to get started. We have signed a contract and written our first check.  [Sidenote- I am so tired of giving the house tour and explaining what we want to do. Hopefully I have now done it for the last time.]

current state of the living room- we tore out the corner trying to find the source of a leak almost a year ago.

part of the living room where the new kitchen will go

the bar in the living room in all its glory

the current kitchen/laundry room, soon to be a bedroom

the current bathroom/sauna

As I described quite a while ago, we have big plans for our house. We want to renovate the basement into a functional apartment. On the first floor, we want to upgrade our kitchen, add a half bath and mud room, and open up the wall between the kitchen and dining room. On the second floor, we want to add a master bath & walk-in closet while closing in the sleeping porch. Originally we planned to do one project at a time, starting with just the basement and taking roughly 5 years to finish the whole shebang. As we talked to contractors though, it became clear that it would cost more to spread the projects out because we would inevitably end up tearing out finished work. So, instead, we revised the scope to try to do as much as possible now to set ourselves up for the future projects.

It took a while to figure out where to draw the line between phase 1 (being done now) and phase 2 (some random point in the future when we'll complete the rest of the renovations). We finally figured it out, based on our budget and what makes sense to do.

Phase 1:
  • totally renovate the basement
  • remove the wall between the kitchen and dining room
  • remove the pantry
  • close in the new mudroom and half bath
  • prep pipes for new half bath on first floor
  • close in the sleeping porch
  • add new washer/dryer upstairs


Phase 2:
  • complete the half bath
  • renovate the kitchen
  • add the master bath & closet
  • remove other walls upstairs to access old sleeping porch
  • add door from dining room to patio

So, phase 1 is a huge project, and preps us for phase 2 in the future without undoing any of the completed work in the basement. Ideally, it also sets us up to tackle some small parts of phase 2 ourselves, so that we can make progress while we save up for the contractors to come back. In particular, I'm thinking that the new master closet, which is just some framing and sheetrock, will happen really quickly [Hello massive, walk-in closet, I've been dreaming about you for a while].

Now that we've finally figured out the scope of work and nailed down the contractor, we are waiting for them to finish up their current project before they can start with us. That means it's time to start shopping. We need to start picking materials so that everything's ready to go when the contractors start. This is generally what we're going for: light and bright, neutral but not boring, and tasteful but durable.


  1. Neutral, light wall color
  2. Brushed nickel finishes
  3. Grey backsplash for the kitchen
  4. light quartz countertops
  5. more nickel finishes with elegant lines
  6. Faux-wood floor tile throughout
  7. White cabinets
  8. Light gray bathroom floor tile
  9. White subway tile for the shower walls

We're expecting them to start in 1 month (beginning of June), and then take roughly 2 months to complete. So, by mid-August, we should have a finished basement apartment, ready to be rented. I've been horrible at judging the timelines for this project so far, but hopefully we're really on track now and will have a tenant by the fall. Yay- actual progress!!!

Monday, April 28, 2014

Spring Garden Update

Spring is finally officially here. After a miserable winter with more snow days than I can remember, it's time to get back in the yard and give it some love.

First- a quick shout out to the glory of bulbs. I paid like $10 for a bunch of tulips and daffodils, and spent like a half hour putting them in the ground last fall. Then, like magic, they arrived and are awesome. I'm a huge fan and will definitely add more next year. Thank you squirrels- sorry I doubted you.
a bunch of tulips and daffodils in front of the garage
 
tulips and pansies on the side yard 

lots of tulips in the quarter-circle

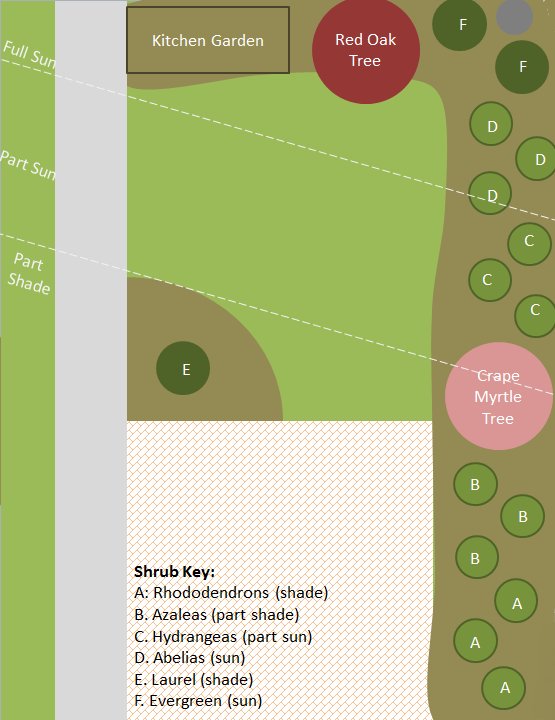
Next- it's time to add in new shrubs. I'm partial to shrubs because they take minimal work and come back or stay around all year long. If you remember, I tried really hard last year to put in shrubs that would be right for the light, appropriate to our climate, and ensure that something was always blooming.

The Original Well-Intentioned Garden Plan from last year


Unfortunately, I underestimated the amount of light we would get (because I was watching in the spring), and I made a number of nice plants turn into toast. Additionally, it appears I under-watered everyone too, probably compounded by a hot summer and our long trip to Thailand. I watered briefly every day, but I should've watered less often with more water. In short, almost every plant suffered and/or died.

The Grim Results from Last Year's Garden Plan
 
Now that I've figured out the light and the watering dealio, I am ready for my second try. I am moving the living shrubs to better spots, and buying new sun-loving plants for the open spots. I'm also moving the kitchen garden. It did really well last year, but was horribly ugly. In the new spot, it will still get the same light, but be better hidden from view.
 
While we're at it, I'm adding a tree to give us a little more shade and add some height to the yard. Since we already have a red oak that's amazing in the fall and a crape myrtle that blooms in the summer, I wanted something that would bloom in the spring but stay small enough to fit in the stone quarter-circle. We picked a red bud, which is one of my favorite spring trees; it looks like a normal tree that's been dipped in sprinkles.
 
New Garden Plan
 
So, once everything was planned and purchased- we got to work putting it all in the ground. Unfortunately, that meant I had to carefully remove all the still-blooming tulips so that I could breakup the ground, add nicer soil and put in the new guys. Then I carefully added the tulips back, but they don't seem super happy about it. Finally, I mulched everything to help them hold on to water and hopefully do a better job preventing weeds.

New Red Bud Tree in the Quarter Circle
 
Azaleas and Gardenias along the patio (should smell amazing all summer)

Kitchen garden to the left, New abelias with drapey tulips on the right 
 
more kitchen garden- hard to see in the sunlight.
 
some fabulous new pots full of herbs
 
relocated Rhododendrons looking happier

a view along the sidewalk- new purple grasses in the front, then pansies & hostas, then the newly-moved Rhodos in the back
 

I'll come back later and add in more annuals for color, but hopefully the main landscaping back here is done. I'm crossing my fingers that I got it right this time, and if I water correctly, everyone will live through the summer and for years to come.

Friday, April 18, 2014

Organizing the Garage - Part 2

Sorry for the delay- lots of exciting stuff going on in the personal life that prevented any progress on the house. (I've got a new sister in law!!). So, now that things are getting a little bit back to normal, it's time to get back to work.

So, we got started on fixing up the garage a couple weeks ago to get the tools out of the basement and make a more functional workspace, more on that here. We just finished it off with a few more steps.

Step 1. Buy a nice cabinet and bench.
So there's no diy here (unless you count loading them up), but sometimes you have to know when to do it yourself and when to just buy something. We found these sturdy-looking components online, ordered them, put them together and loaded them up. Done.

putting the cabinet together

all loaded up and well organized

the new finished cabinet and bench

Step 2. Organize the small bits.
Same as above- there's no diy here, we just purchased something and used it. This one took more time to sort out all the tiny pieces.
the new holder of little pieces- in a convenient location

Step 3. Install a hanger thing for the garden tools.
I prefer to keep the garden tools off the ground, so we grabbed two of these hanging things. Because the cabinet was so nicely organized, it was easy to find the masonry bit to quickly screw into the wall.

one of the hanging things

both hangers up and all the tools off the ground

and viola! the complete workshop/garden area. 


So, now the garage is a functional workbench and garden area, and the basement is empty and ready to be renovated. Inching closer to getting this renovation started... stay tuned.

Tuesday, April 1, 2014

2 quick fixes for the bathroom

So, we are about to have some house guests, which always makes me feel extra critical about the house. In particular, our upstairs bathroom is really gross. I want to rip the whole thing out (and probably will someday soon), but in the meantime, I just need to make it work better and be a little less gross. 

So: Project 1: Clean the skylight window. 
We have an awesome skylight in this room. It's actually a window that tilts, so you can release the hot, steamy air up into the shaft that goes to the skylight on the roof. The problem is that paint in the light shaft has been peeling and other dustiness covered the window with grime. 

the skylight window covered in paint chips and dirt

looking straight up- see all the peeling paint?

close up of grime

after a lot of windex and scrubbing- the window is clear. now you can see the peeling paint better!

Project 2: Recaulk the Tub
The caulk around the tub has turned black

close up of black caulk

i got a paint scraper and flathead screwdriver and started peeling out the old caulk and excess grout

all clean

sidenote- Wally loves the shower. 

after a new coat of caulk

all clean. 

There is SO much to do in here- but these two small projects make it a little more hospitable for our house guests. 


Sunday, March 23, 2014

Lightswitches & Outlet Covers

Our downstairs is covered with these light switches- they are some kind of metal, very ornate, and kind of cool. It would be a shame to replace them with something completely new, but the brassy color kind of irks me. So, this weekend's easy project was to just spray paint them all.

the before: a brassy, ornate lightswitch

Step 1. Remove all the switches and plates.
This is super quick with a flat-head screwdriver. I just ran around the house collecting all the lightswitches and outlet covers and brought them to the basement.  I laid the outlet covers on a big plastic bag, and created a stand for the screws with a spare piece of cardboard.

all of the outlets and switches on a big plastic bag in the basement

the screws in their cardboard stand

Step 2. Spray.
Using a can of oil-rubbed bronze spray paint, I sprayed lightly and quickly to cover them all. Because of the ornate 3-d-ness, I made sure to move around and get at them from all angles.  The screws got a very light dusting so they matched, but the screw groove still worked.

outlets get a coat of paint

screws get a light coat of paint

Step 3. Replace.
After drying for a couple hours, I replaced them all from whence they came. Super quick and easy!

the after: a new lightswitch cover in place


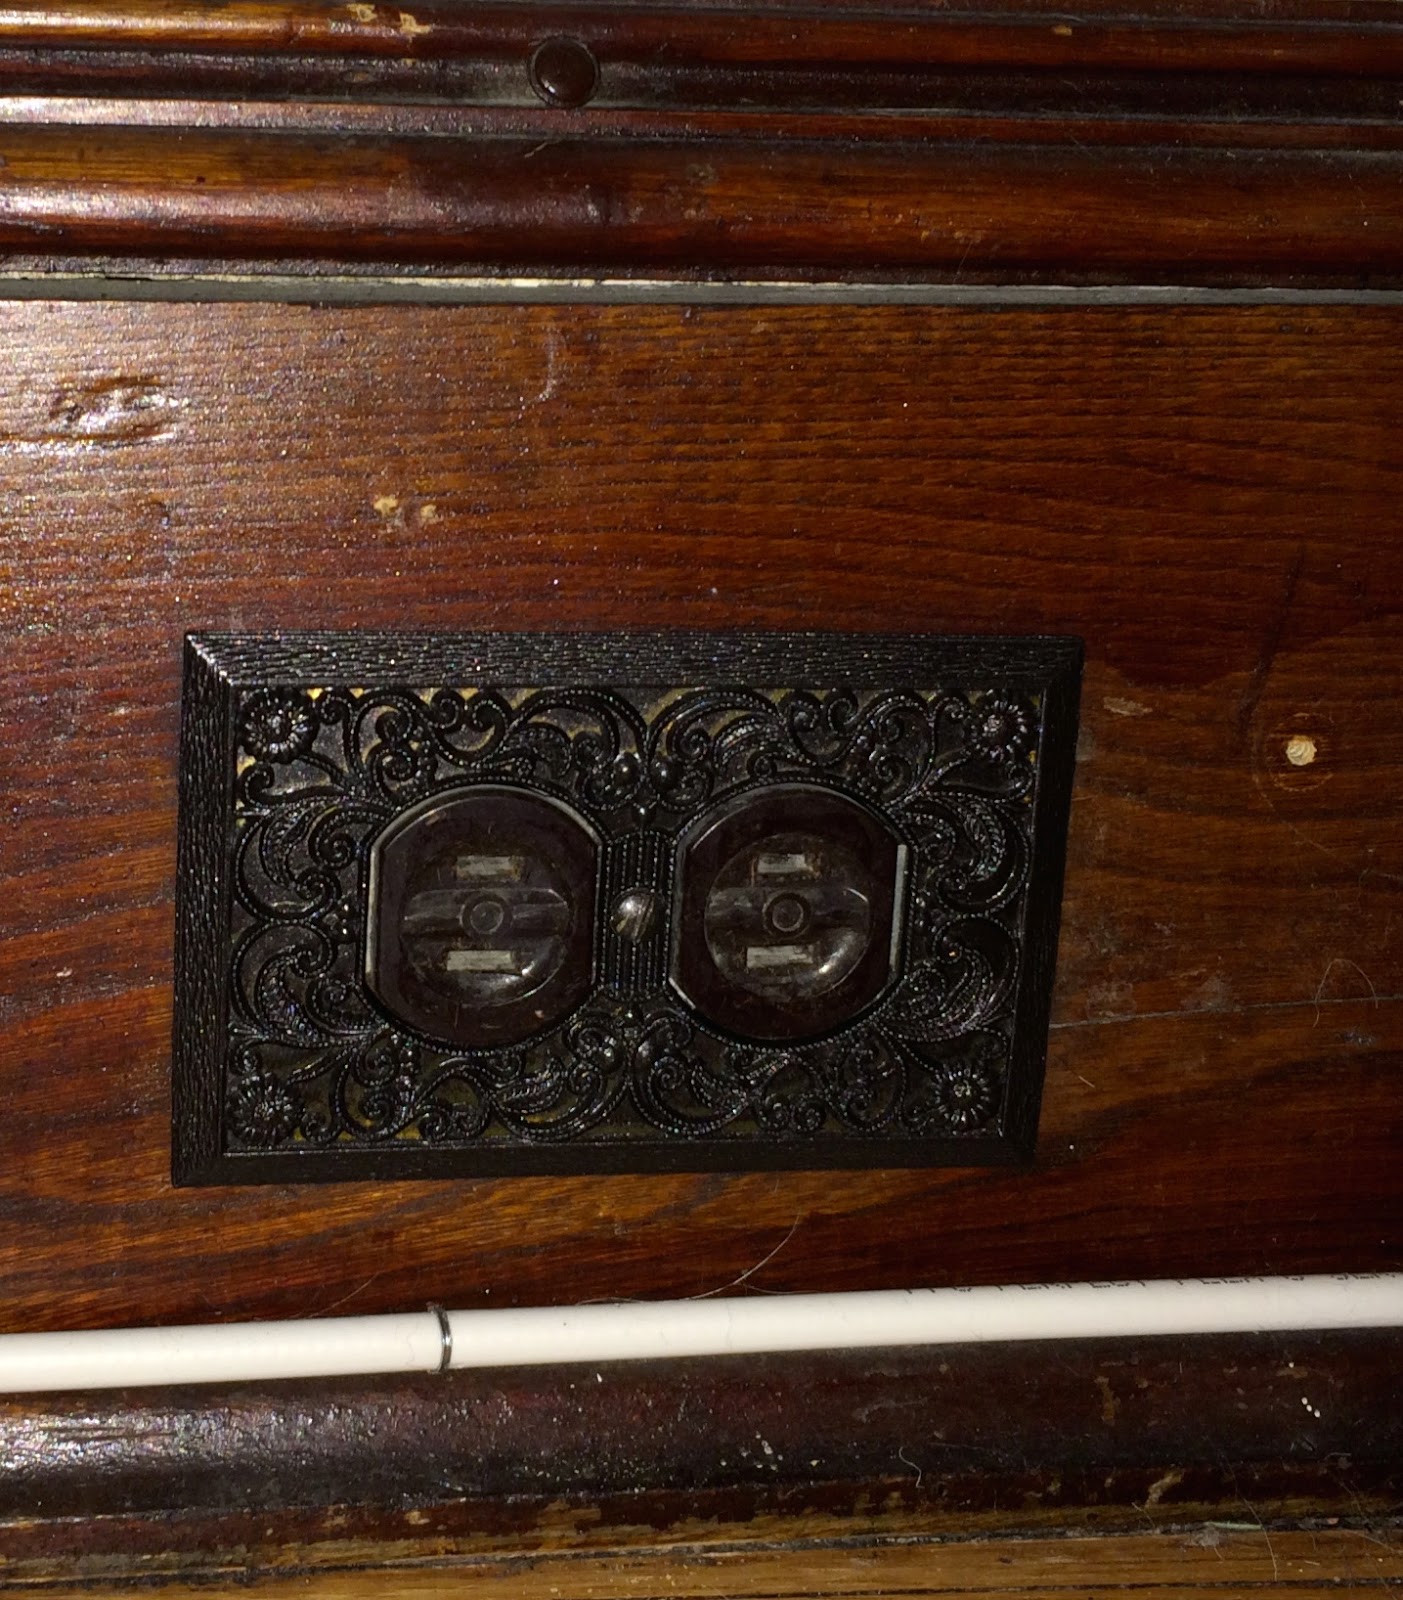
one of the new outlet covers on a dark outlet

another outlet cover on an almond outlet 

Ok, so it's a small improvement. All of the downstairs outlets are now the same and they all match the same metal as the new downstairs lights and doorknobs. I like that this project kept the character of the old house, but modernized it a bit.  Of course, as is true with every project, instead of feeling finished, this project feels only half-done. I would love to switch out all the almond-colored outlets for the darker ones downstairs so they blend in with the wood trim, and switch everything upstairs to new white outlets and covers-- but we'll leave that for another day.  

Total time = 4 hours
Active time = 1 hour
Total cost = $7