Sunday, March 6, 2016

The Dining Room Door

So, last December we completed the back steps project, which I explained here and here. In the process of getting bids from contractors for the stairs, we asked them to also give us a bid to turn the dining room window into a door. Our theory was that they were two sort of similar projects in the same part of the house, so it might be cheaper to do together.

Well - we ended up doing the stairs on their own because the contractors never got back to us in time. Then, one of the contractors did finally get back to us, after the stairs were already done, with a nice quote for the back porch project. So, even though it wasn't a huge priority and we only ever intended to do it in combo with the stairs - low and behold, we decided to go ahead and do this project now.

The Problem
There is a small patio on the back of the house, off of the dining room windows that we cannot use. When we first moved in, there was a very narrow walkway from the back door, behind the pantry, over to this little porch. During the Big Renovation, we expanded the old pantry to make the new half bath (which I swear is actually going to become a functional bathroom this year), which cut off the little walkway. At the time, we thought that we could just access the porch through the dining room windows, but I think that only happened once or twice before I got massively pregnant (no longer able to get myself through the window) and then the kid arrived (didn't want to carry him and stuff through a window). So, basically we just lost access to our little porch.

the small inaccessible porch

The Goal
We have a nice back yard with a table and chairs and an umbrella, but we don't use it as often as I would like. In the summer, it gets really hot. Even with an umbrella, it's not really covered from the rain and only offers shade to some of the chairs. Even though the new stairs are awesome, it's a bit of a hassle to bring dishes and stuff up and down the stairs and through the two back doors. The table and chairs are nice, but not very comfortable for conversations. So the theory is that the little porch would be an alternate outdoor space that would be more accessible to the kitchen, covered and therefore cooler in the summer. I'm thinking this would be a great morning coffee or evening glass of wine kind of spot.  It's pretty small - so we're not going crazy with lots of extra furniture.

dining room windows, looking out at the small porch

Step 1: Wait
Once we finally signed the contract, we waited for the special-order door to arrive. Then it snowed which caused more delays. Then the door finally arrived, and they could get started.

Step 2: Remove the Window
The first day of work, they removed the old window and cut out the bricks below. They grinded down the remaining cement and stuff to make it flat and smooth and level with the dining room floor.

Day One: Old Window and Bricks are Removed

Step 3: Install the Door 
The next day, they installed the new door by creating a door frame for it and attaching the hinges. They patched the wall, but didn't paint or install the door knob.

Day Two: Door is In

Step 4: Finishing Touches
On the third day, they finished up the trim, and painted the walls.

Day Three: Nearly All Done

Step 5: Paint
We saved a bit of money by having them install a primed, but not painted door, that I planned to paint myself. That, of course, took like a week to finally get around to doing. But eventually, I painted the door, we moved all the furniture back - and this project is done.

Next up, we will want to fix up the patio itself, but since it's still basically winter - that can wait until later. For now, this is already a huge improvement - we get so much more light in the room. Looking forward to actually using this new little space.

All Done - door from the inside 

feeling conflicted about the painted and unpainted trim in the same room

view from the outside

a surprisingly big little porch

so much more light coming into this room

While this was sort of an odd project to do now - we are happy to have tested out a new contractor. We're hoping that we can use them on some future projects, so it was great to get to test them out on something pretty small. Obviously, there is no shortage of projects to do around this house.

Tuesday, February 23, 2016

More Fireplace Room Upgrades

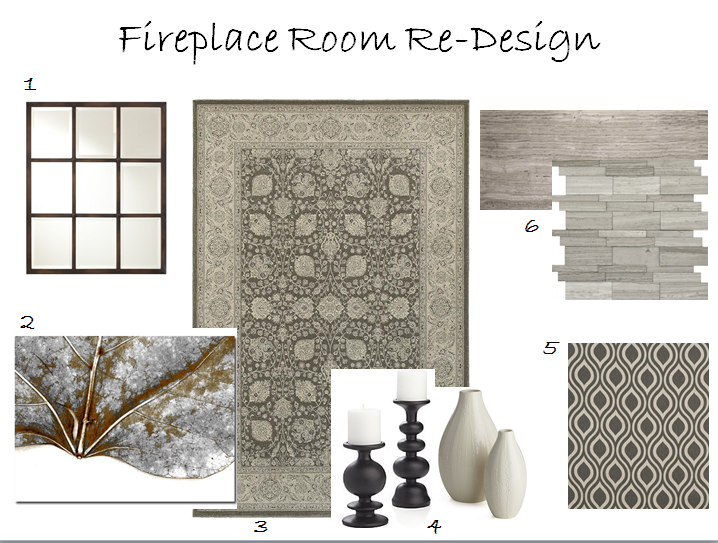
So - I told you last month about our exciting new rugs and the dramatic improvement over the previous ones. Even though the old rug in the fireplace room was a total mismatch for our house, I tried to design around it - which totally didn't work. So, here's the new design plan, centered around the new rug.

  1. A new mirror, maybe metallic
  2. New wall art
  3. Fabulous new rug
  4. A few things for the mantel (here and here)
  5. Fabric for a new chair pillow
  6. Grey marble or limestone tile for the fireplace and hearth
Now that we have a new design plan and made big progress with the new rug - I made a couple more small upgrades to get this room shaping up.

1. New Wall Art
Spouso found this fun print at Etsy, which we both liked. Since it's rare for us to both like the same wall art, and it has a really similar color scheme to the new rug - I bought it immediately. I picked up a cheap, simple frame from Amazon, and then got a new mat from our fancy framing shop - and viola - coolness. We are slowly replacing a lot of wall art that was either print outs of travel pics or in very small frames, (or both), so this is a nice upgrade from what was there before.

2. A New Pillow
We keep one of the extra dining chairs in this room for seating - but it's always looked sort of crappy against the wall of nearly the same shade. Last year, after I made Christmas pillow covers, the bright red Christmas pillow stayed on this chair all year long, just because the contrast was so nice. Well -  I finally made a pillow specifically for this room using more of the same extra fabric I used on the cat radiator seat in the dining room. It has a zipper, so I can remove and wash it if needed (it's basically the same design as the toy bag, without the liner).

Wally models the new pillow and wall art casually. 

3. Wall Patches
There were two eyesores in this small room - one where the old thermostat used to be and the other where a chunk of plaster came loose when the kitchen wall came out and the house shifted. I just pried out the loose plaster, filled with mud, sanded smooth, and painted.

massive wall chunk

wall gets patched (and then painted)

So, clearly not finished - but making some real progress.

Wednesday, January 13, 2016

New Rugs!

Apparently I've mentioned several times how much I hate the rug in the living room. This beige behemoth was left behind by the previous owner of our last house. We never liked it, but couldn't pass up a free, massive rug. The problem is that the color is almost the same as the couches (which we also hate), and only slightly different than the wall color, so it all blends together in a massive beigey boring blah. On top of that, it's solid colored, so it shows every stain and hairball clearly. Plus, it's real wool, which is nice in concept, but really scratchy and uncomfortable to sit on. Basically, I hate this rug.
the dreadful rug

so much beige

ugly couch practically disappears

At the same time, I bought a new rug for the fireplace room just after we moved into this house. I found it on one of those flash-sale sites, and thought it was perfect because it was my color scheme and vaguely trendy. Well, as soon as it arrived, it was clearly a bad fit for the house. The color scheme was boring while the pattern was frenetic, and it turns out we're just not trendy. I tried to decorate the room around it, but it just didn't work. Every time we walked through the room (which is all the time), I cringed at this out-of-place rug.

the blue and white rug

a fireplace room that just isn't working

Then Christmas arrived, and we got a fabulous gift. My mother in law gave us money to buy a new living room rug, but because of a deal, we were able to stretch the money to buy a new rug for the fireplace room too. We got some extra fluffy rug pads from Amazon as well, and now everything has arrived. We happily threw the old rugs out of the way, and unrolled the new ones.

the new living room rug

living room is looking more interesting

the couch no longer disappears against the rug

the new fireplace room rug

fireplace room looking a bit nicer

Then the old rugs were repurposed elsewhere in the house. Eventually I would love to get rid of them altogether, but until then, they are still useful to have around. The beige behemoth got moved to the dining room, which also needed a rug, where it is less ugly because there's more contrast with the furniture and walls. This gives us another padded place for the boy to play while we're in the kitchen - so that's really helpful. The blue and white rug moved upstairs to our spare room which is currently sort of my closet and had an awkward echo happening.

blue and white rug upstairs in the spare room

beige behemoth in the dining room-- not so bad, right? 

Yay Christmas!!! Thank you! Now let me tell you how much I hate the kitchen...

Tuesday, January 5, 2016

Gussied Up Toy Bags

This Christmas we were shopping not only for our own little person, but for our four nieces and nephews as well - ie, we bought a whole bunch of toys from Amazon. For the toys with smallish or numerous parts (like blocks and shapes, etc), I was feeling a little guilty/preemptively annoyed that they would be opened on Christmas day, quickly poured all over the floor, and stepped on, with some pieces never to be seen again. To keep things together and organized- I thought it might be helpful to make little bags. I like the idea of making homemade gifts anyway, and we still have a lot of leftover fabric from the kid's room projects to use up - so this is perfect.

Note: I actually made drawstring bags after thinking through the process and building my own pattern. Once I was done, I was devastated that my bags wouldn't close all the way - leaving an opening about the size of a hand that toys would easily fall through. A quick search of mom blogs and pinterest suggests that everyone else has the same problem (it's the same reason that pole-pocket curtains won't open all the way, you're trying to compress fabric without giving it anywhere to go). So I decided to go back and retrofit my nearly-finished bags to have zippers instead so that they would actually close all the way. The directions below are what I should've done from the start, based on the infinite wisdom of Martha.

Step 1. Shopping and Prep
First up, find a good sturdy fabric that can take some abuse (I used leftover cotton drapery fabric), and wash and dry it to preshrink. Then iron and cut out two large rectangles, sized to whatever you're trying to hold. (I used a large cutting board as a pattern). Then take the lining fabric and cut out two rectangles the same size as the exterior pieces. I also bought a pack of multicolored zippers to close the top.

Step 2. Make it Fancy
This is totally unnecessary, but a fun step to make things a little more personal/difficult. Using another Martha idea, with some variegated embroidery thread and an embroidery needle, I just made some simple running stitches and backstitches to add highlights and trace around some of the patterns in the fabric. The idea is just to add a little texture and visual interest, nothing super complicated. This step is easier to do now before the bag is put together so that you can access the back of the fabric, but be careful to stay away from the edges of the fabric, which may get cut off when the bag is put together. [FYI - this is why the bag is lined. If it weren't lined, you'd be able to see the backside of all this stitching, which is unattractive and could snag on toys.]

embroidering around a starfish

closeup - note the cool ombre thread happening

Step 3. Sew the Fabric to the Zipper
Once the detail work is done, it's time to put the bag together. Layer the exterior fabric on the bottom (facing up), then the zipper (facing down), then the liner (facing up). Then sew across the top. Flip, and repeat for the other half of the bag.


Step 4. Sew Panels Together
Now all four pieces of fabric are sewn to the zipper, but not each other. So pull the liners together (facing each other) and the exterior pieces together (facing each other) and sew the three sides of each panel. Don't sew over the zipper, and don't sew the liners all the way closed.


Step 5. Flip and Hand Stitch
Using the remaining opening in the liners, flip the bag right-side out. Hand stitch the remaining gap in the panels, then push the liners through the zipper into the exterior panels. The bag should now be finished.


Step 6. Add Ribbon, stuff with toys
Lastly, I added a couple inches of ribbon to the zipper pull, just to make it a little easier to grab. Then the bags are truly all the way done and ready to be stuffed with whatever needs to be put away. For us right now, it's small teething toys.

a bit of ribbon added to the zipper makes it easier to pull

finished bag holding our many teething toys

soooo many teething toys. 

Tuesday, December 22, 2015

Upholstered Radiator Seats

Every Christmas, I feel like there are some people who are really easy to shop for and others that are impossible. For the easy people, I always end up going overboard simply because I know that they will like the gift - even though maybe it's excessive and unnecessary and I should spend the time on the more difficult people. This is an example of me ignoring my better judgment by wasting time on a totally excessive gift.

wally on our bedroom radiator

So - our house is heated by radiators. Once they come on sometime in the fall, the cats can reliably be found on top or near them, practically all day long until spring rolls around. I've draped some towels and bits of fabric on the radiators for extra padding, but it seems like they're still pretty uncomfortable. As my Christmas gift to the cats, I decided to make an upholstered seat to rest on top of one of their favorite radiators in the dining room. It could also serve as extra seating for humans, but that's not my primary goal here.


Wally on some fabric scraps on the dining room radiator

Step 1. Gather Materials
Since this is a gift for cats at a pricey time of year, my goal is to use as many leftovers and existing materials as possible. So I start in the wood pile and find a 1"x8" that's exactly long enough for the radiator to serve as the top, and some 1"x2"s to serve as the sides. I have spare fabric that used to be the curtains in the old office that will work perfectly, so it just gets washed (ironically, to reduce the cat hair). For the padding, I turn to Amazon and buy some 1" upholstery foam and batting and silicone oven pads/trivets.

Step 2. Assemble Frame and Top
First, I cut the 1x8 down to be just slightly longer than the radiator's widest points. Then I cut 2 1"x2"s to be the same length as the top, and 2 1"x2"s to span the distance from the outside of the 1"x2"s and the board. Then, using wood glue and some wood screws, I screw it together so that the 1"x2"s cap the board and are flush on top. They will prevent the board from sliding around on the radiator. This will all be covered, so ugliness isn't important.

cutting down the boards

test fitting on the radiator - everything fits

Step 3. Upholster
I cut down the foam pad to the same measurement as the frame and glue it down. (Note - you're generally supposed to use spray upholstery glue, but I didn't want to buy any. Instead, I used an old glue stick). I wrapped the pad in a thin layer of the batting, which is just meant to smooth out the pokey edges of the pad and stapled it down. Then I draped it in the fabric, flipped it over, and started stapling like crazy. The hardest part of this part was keeping Wally away - as fabric on the floor is basically his favorite thing.

1" pad on top of the board

wrapping in batting (find the cat in this picture)

batting all stapled down

fabric stapled down

Step 4. Heat proof
Once I was all finished with the fabric, I flipped it upside down and stapled on two silicone oven mit things. The goal here is both to reduce the risk of a fire by preventing the wood and fabric from resting on the hot radiator all the time (they don't get that hot, but it seems like a good safety precaution), and to prevent the box from sliding around on or rocking on the radiator every time Wally jumps on it.
an oven pad getting stapled to the underside of the bench

Step 5. Enjoy
After everything was finished, I placed it up on the radiator and set Wally up on it. He was a little uneasy at first, and then seemed to get the hang of it.  I think the first Christmas gift of the year is a hit. This was totally an unnecessary project, but it only took a couple hours and like $20 - so I'm pretty satisfied with it.


check out the nice corners

Wally takes a nap

Friday, December 18, 2015

Our New Back Steps

So, a little over a month ago I posted the intro to our back steps project. Short summary - they were falling apart and becoming really dangerous, so we decided to have someone replace them.

the old stairs are crumbly and uneven

Step 1 - Find a Contractor
Finding a contractor to do the work is always so much harder than it seems like it should be. We used Angie's List and Yelp to find a few well-reviewed companies that either were welding companies that would build metal steps or were general contractors that would build wooden steps. We probably called or emailed 20 companies. Of them, maybe 5 actually came see the steps and walk through the project. Of them, only 2 actually submitted quotes. We picked the cheaper one.

Step 2 - Pick a Design
None of the general contractors got back to us, so our only option was to build metal stairs, which were our preference anyway. Our original goal was to have cast iron steps, which are really common in older parts of DC and look really stately. We discovered quickly that we couldn't afford cast iron (roughly $10,000-$20,000),  but could do cheaper steel stairs. The company we picked could build a basic option which was pretty industrial, or a fancy option which was a little more ornamental and meant to look kind of like the cast iron steps we really wanted. We went back and forth on it - but ultimately decided that we needed the fancy option.

a random house in DC with nice cast-iron stairs

Step 3 - Demo the Old Stairs
One of the other things we debated was doing the demolition ourselves to save some money. Thankfully, we opted not to do this, and instead came home one day to find the entire cement and brick block removed. They also hauled away all the debris, which is really hard for us to do. I think we could've rented a jackhammer and sledge hammer and done this ourselves, but it would've been back breaking, and then we would've had to haul the debris to the landfill, probably in a couple of loads, which would've taken forever and destroyed our car. So, I'm ok with paying for them to do it.

huge chunks of cement that i didn't have to breakup

Step 4 - Install the Prebuilt Stairs
They built the steps in their workshop in advance, and then just plopped them in place after the demo was done.

new stairs are installed but not finished

Step 5 - Add Finishing Touches
Then, after some rainy weather (apparently you can't weld in the rain), they came back to finish up. It turned out that the cement block wasnt solid, but had a little brick wall under it, flush with the house. They originally left it for security reasons, but we decided to have it removed so that more light could get to the basement window. After demo, they added the new security bars for safety. Then they added the ornamental final touches to make the fancy stairs, and then gave them a quick paint job.

all done!

view from the top: a nice landing to step out onto

close up of the fancy bits

more fancy bits

new bars under the stairs- let lots of light into the basement window

view from the side: lots of new storage space for something

closeup of the cement under the steps: needs patching

I am so excited about these guys. I know that fancy back steps aren't really the top of anyone's dream list, but I am just so happy with this project. The old ones were getting so dangerous and hard to use, these are just infinitely easier to use and feel so much safer.  I'm glad we opted to fancy it up a bit - these aren't original cast iron stairs, but they don't look like an obviously modern and industrial add-on to the house. We still need to patch the cement under the steps, but that can wait until spring.

We have generally tried to balance house projects that are functional with house projects that are aesthetic, so I feel like now's the time for a pretty project to counter this entirely functional one.