Wednesday, May 17, 2017

Introducing the Kitchen Project

As a couple of people who both really like to cook and entertain, our kitchen has been a disappointment from the moment we moved in. We made a number of significant changes to the room already, but weren't able to do a full renovation. Now that the skylights are installed upstairs, we have to do the master suite project, which will involve tearing up the kitchen for plumbing and electrical, so we're going to do the kitchen at the same time. We're about to start another major renovation.

Work Done So Far
First - a quick look back on what's already happened and how we got to where we are:
  • So, when we first moved in, the kitchen was a small room with cabinets all on one side, a huge pantry, and a wall separating it from the dining room. It was immediately clear that there was not enough counterspace or cabinet space, and only one drawer. We put a small table against the wall to help, but it was clear the room needed a lot more work.
yikes. I forgot how yellow the trim used to be.

view towards the dining room- pantry on the left.
  • During the Great Renovation of 2014, our contractors took out the wall between the kitchen and the dining room, which was great because it opened up the rooms and made them both feel bigger, but not great because now you had to look at the kitchen while you sat in the dining room. They removed the massive walk-in pantry to make the space into a halfbath, which left all of our things with nowhere to go. We brought in two massive shelves for temporary storage, which were really unattractive.
wall comes down

view from the dining room - pantry shelves on the right
  • Then, in 2015 before starting the nannyshare and worrying about the shelves crushing our newborn - (actually, I was much more worried about the other kid getting injured) - we got rid of the wire rack and brought in two huge cheapo cabinets to hold all the small appliances and add extra counterspace. The other wire rack acting as our pantry was moved out onto the unfinished mudroom space.
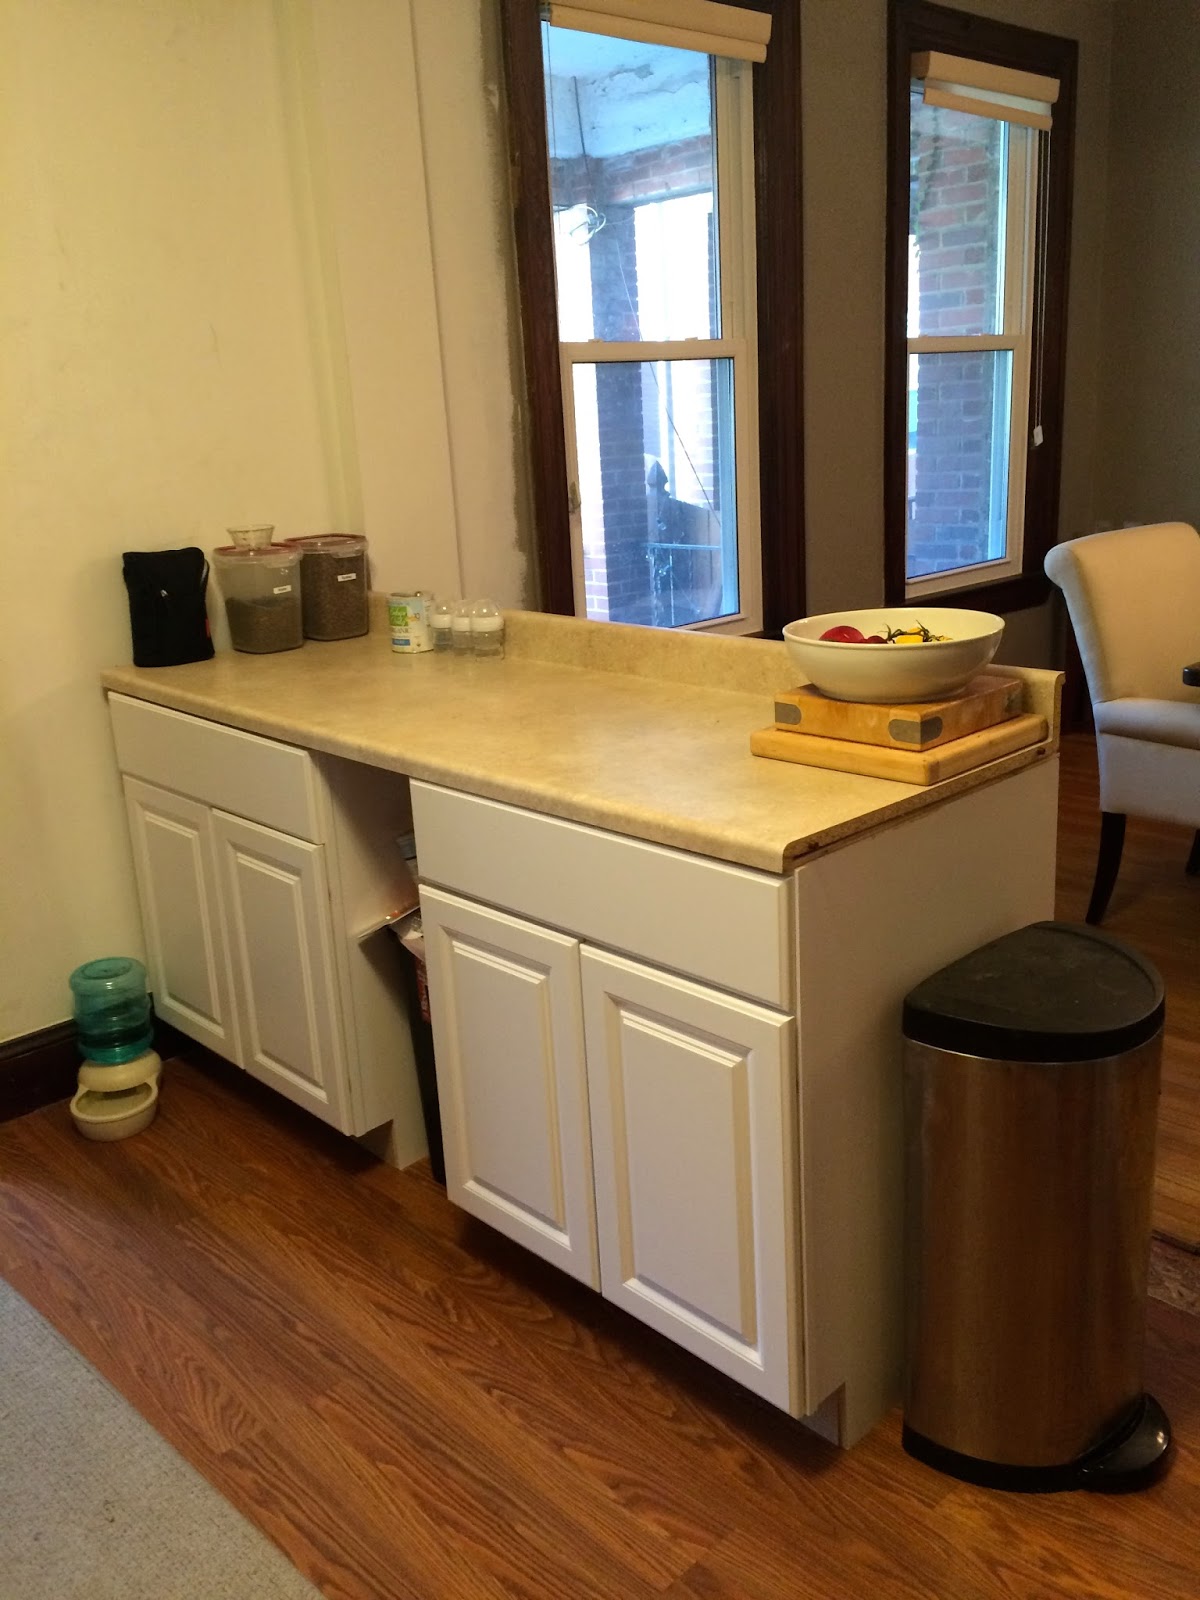
new cheapo cabinets for storage and lots of counterspace

pantry lives out on in the mudroom
  • Then, last summer we finally finished the mudroom, which meant the pantry had to move again, so we bought two more cabinets to go on the back of the island for the pantry. We also finally closed up the open holes that the contractors had left 2 years earlier and hung some shelves. So this is where we are now.
new shallow cabinets on the island become our pantry

view from the dining room

Problems with the Current Kitchen
There are a bunch of problems with this room that prevent it from being anywhere close to my dream kitchen. Let's start with the layout.

 
the current layout - crowded and lopsided

  • The cabinets and outlets are all squeezed in the corner, right between the stove and fridge - so as soon as anyone wants a cup of coffee, a plate, or to use the microwave, they are in the way of anyone else trying to use the fridge or stove. Generally, I want to stretch out and spread out the main work areas, so that it's possible to have two people in there at the same time.  I want to create a small wall for the coffee maker, microwave, and glasses and dishes - so that it's possible to pop into the kitchen for those basic things, without getting in the way of the main work areas.  
  • The counter space is not near the appliances or sink, so we are constantly carrying things back and forth from the fridge, to the counter, to the stove- making it even harder to have multiple people in there at the same time. More counterspace on either side of the stove and sink would really help, as would having things stored in the cabinet where they will actually be used (like knives and cutting boards by the sink). 
crowded corner is our big problem area

As for appearance: 
  • The upper cabinets don't go all the way across the room, so it always looks lopsided to me. I want some balance. 
  • I really hate the granite and the orangey-wood cabinets that our predecessor put in - they are super dated and make the room darker. The cheapo white cabinets that we bought of course look cheap, and clash against the older ones. 
  • The floor is a plasticky laminate that is super slippery when wet (which is why we have that hideous rug on the floor). It was also installed over the previous floor, so the whole kitchen is about an inch higher than the rest of the first floor, which makes everyone trip.
  • The walls are a painted, textured wallpaper, which is constantly filthy. The walls are also like three different levels, which makes the cabinets bump in and out. 
  • There aren't enough lighting options - so it's either way too bright or too dark. I would like some pendants, more recessed lights, and under cabinet options too.
trying to take a pic of the floor height issue - can't take a camera out without the boy running over (total ham).

New Layout
The new plan moves the sink and dishwasher to the island, which be the primary prep area, with items like cutting boards and knives. The stove moves down the wall, with cabinets and counterspace on either side, creating a second prep area between it and the fridge. Beside the fridge will be a real pantry cabinet. My favorite part though is the small wall on the left. This will be shallow base cabinets that create just enough of a counter for a dedicated coffee station, with a microwave below, out of the way of the rest of the kitchen. We will add outlets to the island, which will store all the small appliances.  Generally, the cabinets will store the stuff based on how the counter above will be used - with really obvious changes like storing pots and pans by the stove to minimize travel time.  With two major prep areas, and other stuff out of the way, we should easily be able to get at least 2 cooks in the kitchen without stepping on each other.

the new layout - fridge and stove on top, sink in island

view from the mudroom

view from the dining room

The Design Plan
We've been eyeing a lot of kitchen pictures lately, and come up with a white marble on white cabinets plan because we need as much light as possible. Yes, it's pretty trendy and will someday look very 2010s, but aren't kitchens always that way? I've yet to find a kitchen design that is truly timeless - hopefully this one will stay around long enough for us to sell our house in a couple years. We are debating having dark blue bottom cabinets, maybe just on the island.

  1. Wood shelves (already there)
  2. Marble counters and subway backsplash
  3. Same offwhite color as the mudroom for the walls, maybe the dark blue one bottom cabinets
  4. Same pendent as the mudroom, bronze faucet
  5. White cabinets, shaker door, thinking Ikea
  6. Navy accents for towels and a rug
  7. Wood floors (replaced if needed)
The Work Plan
I've spent the last month tweaking the design and layout, so now I think we're really ready to get started. We're working on getting permits now, and then will start to reach out for quotes. The plan is to not use a general contractor, but to hire the trades individually instead to save costs. We will do some of the work ourselves, like installing the cabinets and tile, but hire out major stuff like plumbing and electrical, and maybe the demo and sheetrock too. 

Living in a construction site is never easy, but living without a kitchen is particularly hard. We're going to do what we can to move this along as quickly as possible, while relying on things like the grill and outdoor table, and probably lots of takeout. 

As I mentioned, the plan is to do the kitchen at the same time as the master suite because we will have to tear up floors and walls to install plumbing and electrical.  More on the master suite plan next. 

Saturday, April 29, 2017

Roof Stuff

So - two of our last major renovation projects just collided - 1) We had a contractor last summer install a vent through the roof of the sleeping porch to vent the toilet in the half bath below, and 2) we then sheetrocked the sleeping porch, trying to finish out the space. (10 points if you can guess what comes next)

we have a leak. 

So - it turns out that the vent was not installed properly, water slowly got into the roof, and one night during an intense storm - we heard dripping and saw a steady stream of water coming right through our newly sheetrocked ceiling.

this vent is somehow improper. 

Getting Estimates
We reached out to two roofing companies based on Angie's list and yelp reviews for quotes to fix the leaking roof. Since they were going to be up there anyway, we thought this would be a nice chance to put in some more skylights to add natural light to our bedroom and the spare room beside it (something we've always wanted to do), and to take a look at the nasty skylight in the bathroom, which is a constant eyesore. Inevitably, both companies also found a couple other problems on the roof, stuff that was either installed incorrectly or just old and needed to be replaced. Thankfully, both companies said that the main roof was in good shape - a huge relief.

a view of the bathroom skylight from below

I don't think it's supposed to do that.

 
our big old skylight with some chimney leftovers

Both companies had different approaches to the issues - one wanted to just patch the roof and clean up the old skylight, while the other wanted to rip off and replace both. One company wanted to install two new skylights in the bedroom, while the other wanted to install solar tubes. We weighed both options, decided we wanted to do half of one quote and half of the other - and then I managed to negotiate the one company to match the other - so we got 2 new skylights in the master suite, replacing the old skylight, and ripping off and replacing the sleeping porch roof - all for the cost of the original quote. (I am apparently a master negotiator). We signed the contract and were ready to go the next morning.

Placement Issues:
So once we knew who we were using and had settled on skylights (instead of solar tubes), we had to tell them where to put them. This was a bigger issue than you might think, since we have lots of future plans for these spaces. We wanted the skylights centered in their rooms, but we have plans that will change the size and shape of these rooms (adding a new master closet, removing the current one). So we had to quickly map out where the future walls for the walk-in closet are going to go and where the ceiling fan will be once the current master closet is removed to figure out where to put them. They will look super weird until those changes get made, so this more or less committed us to actually doing all of these projects.

time to finalize the plan for the master suite so we can figure out where to put the skylights

Work Day:
Amazingly, they were able to get everything done in one day. I would have loved to stay home and watch, but had to go to work. Thankfully, the roofing guy took a bunch of pictures for me.

cutting a hole for a new skylight

building a new frame (apparently called a curb)

frame gets covered in roofing material

then they plop the new skylight on top

old nasty bathroom one gets replaced

check out all my roof bubbles!
 
oh - and they solved the original issue, by replacing everything on the sleeping porch

Closing thoughts - 
1) I am consistently disappointed every time we hire a contractor (who caused the original damage that led to all this). I feel like we decide to pay the extra money to have a professional do the work instead of doing it ourselves, because we think that means the work will be guaranteed to be done correctly, to code, and whatever else -- but every time, even well reviewed ones cut corners, create new problems, and leave me thinking I should've just done it myself, or hired the subcontractors directly. Working directly with the roofers on this one made things so much easier, even though we now have to find someone else to do the sheetrock work so we can actually see the skylights from below.

2) We now have quite a few sheetrock projects that are accumulating, between closing in the skylights, patching the sheetrock in the sleeping porch, and closing in the air conditioning vents, and maybe a couple more new ones I'm thinking about. I'm thinking about just hiring out sheetrock work in general, since this is really hard to do ourselves and a team that just does sheetrock is quick and relatively cheap.

3) Light is nice. Already the bathroom seems brighter. I very much look forward to cutting into the bedroom ceiling to see the new skylights to let in more light. This is a major downside of rowhouses - inherently dark.

4) It seems like we have to spend a lot of money just to maintain the house, and get to spend much less on actually making it nicer. I don't know if that's just a general rule for houses or old houses in particular - but I think I previously had the impression that houses were a little more resilient. Since we bought this house, we've spent a lot more money on maintenancy stuff than improvementy stuff - we've totally replaced all the guts of the house (water heater, boiler, pump), and replaced most of the pipes in the walls - all projects that aren't even noticeable.  Thankfully, because of the skylight work, the project was at least half about something that makes the house nicer. I'm ready to start working on projects that make the house feel nicer and more functional.

5) We are now committed to the master suite idea - so we are about to get moving on that project. Since it's on top of the kitchen, which also needs to be done - we're about to start both of those projects at once. It's going to be more complicated to do them together, but ultimately cheaper and better than having to tear things back out down the line - so stay tuned.

Sunday, February 26, 2017

Air Conditioning!

So - our 100+ year old house never had central air conditioning, despite the miserably hot and humid DC summers. We got by with two small window units upstairs that were loud and never worked well, and one big floor unit downstairs that was really loud and never worked well. We always knew that we needed to get central air installed, both to make our lives more pleasant every summer and for eventual resale value. Since it's a pretty specialized thing, we thought it made more sense to work directly with a company, instead of paying a contractor to sub it out. And since we've heard that it's cheaper to install in winter in their non-peak time, we wanted to get it started this winter.

Sometime last fall I reached out to a company that specializes in doing high-velocity air conditioning systems, which are meant to be installed in older homes that don't have big air ducts. We thought the quote was a bit high and wanted to get a few other quotes to compare from other companies - but could not get any other hvac company to respond. All of a sudden - the original guy texts me to say he's had a last minute cancellation and can offer us a deal if we can start immediately. So after a little bit of negotiation over text (a first for me), we finally had a deal and scrambled to get ready.

This is just horrible timing for us to have a major renovation occurring. Firstly, we're starting daycare, so we are in the midst of a huge change to the morning and evening schedules, and full of lots of stress and second-guessing. Second, we were about to head out of town for the long weekend, so had to scramble to figure out what to do with the cats and giving them access, etc. Third - well, I can't think of a third right now - but it feels like there are a million things going on and reasons that this was not great timing for us. But regardless - we signed the contract, and they unloaded our new air conditioning system while it was literally snowing outside.

all this stuff arrives the morning they get started

it's just hard to believe all this stuff is going to fit

In the first two days - a team of two men installed the holes and tubing throughout the house. They ran tubes through closets to get from the attic down to the main floor, keeping the duct-work almost completely hidden. On the second floor, they ran the tubes through the attic and into the ceiling, so there isn't any exposed ductwork. They managed to get one vent into every room (and as many as three in the big rooms) except for the new half bath. Because it is an addition, they would've needed to get through the old exterior brick wall and under an old door header - and it would've required exposed vents in really obvious places, so we just decided to skip it.

one of the guys drilling a hole

Then we went to the beach and enjoyed the really warm weather while they kept working.

lesson learned: get out of town if you can

They spent another two or three days getting the unit up on the roof, connecting the power, and getting all the tubes hooked up to the circulator thing. After less than a week, they were gone and you can barely tell that they were there at all.

one of the vents in the kid's room

one of the vents in the dining room

two more in the kitchen above the cabinets

one in the living room - so subtle you almost can't see it

the return is at the top of the stairs - should help circulate air easily through the whole house

We turned on the fan, and it definitely makes a whooshing, whistling noise because it is high-velocity air, but it's so much quieter than the old window units were and frankly might be nice to drown out some street noise. There was only one spot where they couldn't use closets to get to the first floor, so they grouped a bunch of tubes together and we'll have to come back and box it in.

the one spot we need to come back and box in in our bedroom

Even though it is still February, it's now crazy warm here and already clear that having AC will be a very huge improvement for us.

In other news - Spouso told the kid that the new holes in the ceiling were ridiculous, so he now thinks that they are named "ridiculous". He likes to go around the house pointing them all out and shouting "ridiculous!".

Anyway - a huge improvement and major to-do item scratched off our house list. We're talking to architects and trying to figure out next steps for other major projects, while I continue to slowly work on finishing the sleeping porch. Hopefully more progress to report soon.

Wednesday, January 18, 2017

Progress on the Sleeping Porch

So - most of our projects have been rather short-term and distinct - we like to push through and get things done as quickly as possible to avoid projects just dragging on forever. This project is the exact opposite - we have been working on the sleeping porch in fits and starts for several years now. I think it's time to finally post this one, in hopes that this will encourage me to actually finish it all the way.

2012 - Starting Point
So, when we first moved into our house (>4 years ago), there was a wide but shallow room along the back of the upstairs that had really nasty crankable window panes, that was completely unusable in cold weather and obviously in need of renovation. Because the windows were made of many small panes of glass, it was completely open to the weather and thus freezing in the winter and filthy - so we didn't use it at all.

original sleeping porch with floor-to-ceiling crankable windows

2014 - Contractors Fix the Windows
In 2014, as part of our big renovation which fixed up the basement and did some stuff on the first floor, our contractors removed the nasty windows and replaced them with walls and a few real windows. It was closed off but not insulated, so still freezing in the winter and not really usable. At this point, we figured out that our long-term plan for the space is to make half of it a master bathroom, and then other half an office (with a wall in between), even though we couldn't actually make all that happen yet. So - the windows were placed based on the long-term plan and nothing else happened for a while.

after the contractors close in the walls and install real windows

2015 - Good Intentions but No Real Progress
Then, in early 2015, I boldly laid out my design plan and goal to have the room finished in a couple weeks. This was part of the push to finish up big projects before the baby arrived - which didn't happen for obvious reasons. I got only as far as removing the nasty paneling from the ceiling, which made it slightly more attractive but just a bit colder in the winter - so still not usable space.

view to the right

view to the left. basically just a spot for a litter box to go. 

2016 - Impending Deadlines Make Things Happen
So - last year we decided to refinance our mortgage, based on the value of our house increasing. We were told that an inspector would need to come see the house and that nothing could still be under construction, so we got to work finishing all the open, constructiony spaces. We decided to go ahead and finish the halfbath and mudroom, but were torn about the kitchen and sleeping porch - knowing that we weren't ready to really renovate those spaces. So instead, the plan was just to patch the holes in the kitchen and stick up sheetrock in the sleeping porch - minimizing our costs for things that would just get torn out later. We hired a contractor for some of the plumbing and electrical work in the half bath, which included venting the toilet all the way to the roof through the sleeping porch. So they didn't do anything else to the sleeping porch except to install a huge pipe right through the middle of the room. Then, we spent all summer and most of the fall on the halfbath/mudroom project, leaving only a couple days before the inspector was scheduled to arrive. So we finally just took a couple days off work to get it done. We stapled up insulation, rented a van to get sheetrock and a lift to put it up, and then I mudded and primed almost everything (until I ran out of paint). I also used leftover cement paint to fix up the floor. When the inspector came through, it looked like a livable space, but certainly not a nice room. And once that deadline had passed, no more work happened.

 the pipe in the middle of the room

sheetrock going up

more sheetrock going up

the last piece of sheetrock goes up around 2am. there is joy and mirth all around. 

mudding the walls. making a mess. 

after priming and moving some plants back in
(shout-out to our Vienna contingent - Rubberto is still alive!)

view to the right - looking sort of like an office

2017 -  Finish it Up
So, my goal is to finish all of the remaining renovations to the house this year. That means that in a couple months, we will hopefully make the whole master bathroom thing happen. In the meantime, I can finish up the office space myself - which will make the house better organized in the process. My goal is to paint the walls, trim the windows and add some curtains, add some bookcases, get a new desk and chair, and basically do everything that can be done now that won't have to be ripped out for the bathroom project (ie, no floor yet). Meanwhile - we are moving forward on the bathroom and kitchen projects, so more on that hopefully soon.

Thursday, November 3, 2016

Fixing Up the Kitchen

Once we finished off the halfbath/mudroom project, we shifted focus to the kitchen. We are clearly not fully renovating the kitchen, though we really really want to - instead, this is just a sort of patch job to fix up all the holes and glaringly unfinished spots. 

1. Patch the Holes in the Floor
Way back in the day, when there was a wall between the kitchen and dining room, there was a small radiator just inside the kitchen. When the wall came down, the radiator was removed, which left holes in the floor. I covered them with packing tape, which was working pretty well at keeping out the cat food and cheerios that are otherwise dropped down, but we needed a more permanent fix. So, we picked up a couple of wood floor samples, found one that matched the color pretty well, and then just cut it down and glued it into the spaces.  

old floor with holes for the previous radiator...

now patched and nearly invisible! 

2. Paint the trim
Parts of the kitchen have been painted slowly over the last couple years, but there was still some neon yellow trim and a door frame that had been peeling and picked at for a while. So, I grabbed a can of our trim paint and covered everything up.

the last of the yellow trim disappears

3. Patch the Sheetrock
There were several holes left behind from our first contractor when they took down the wall to the dining room and installed pipes for the washer/dryer above. Our second contractor framed those for us - so all we needed to do was install the sheetrock. We picked up the materials, cut them down and screwed them up, quickly mudded a couple times, and then primed and painted them.

second contractor framed in the pipe

and the beam between the kitchen and dining room

so we put up the sheetrock...

and then mudded and painted everything

pipe gone!

4. Backsplash
We used to have one of those stoves with the dials in the back, and a microwave above it - so the painted, textured wallpaper only covered part of the wall behind the stove. When the stove was replaced with a slide-in option and the microwave hood removed - it left a really ugly wall that was partly covered with peeling wallpaper. Thankfully, we could just pick up some peel & stick tile mosaic that was easily cut with scissors to fill the space, and stuck it up quickly.

new tile going over the nasty space above the stove

new backsplash up and definitely making things nicer. 

5. Pantry 
One of our longstanding storage issues has been the lack of a pantry, ever since we originally removed the walk-in pantry to make it into the new half bath. Since then, we've been relying on a set of metal shelves which are really not ideal. Not only are they ugly - but they are completely open and exposed, which means that our kid can easily walk up and pull anything and everything off (which he does all the time). Plus, I have this fear that he'll try to climb them and pull the massive thing over on himself - though he probably doesn't weigh enough to actually do that.  The shelves were originally in the dining room, and then we moved them out to the mudroom where we thought it would be safer - and then once we started working on the mudroom, the shelves got moved back into the dining room again.  After cleaning up an entire box of pasta that was thrown around the dining room one too many times  - we finally decided to come up with a new, more permanent solution by adding more cabinets onto the back side of the kitchen island. Because they are top cabinets, they are only half the depth of a base cabinet, making it easier to see everything inside and not taking up to much more floor space. We grabbed 2 3' wide top cabinets, and then built a quick frame to get them up off the ground and level with the base cabinets. Then we just added a long 1"x12" shelf board to serve as the countertop. This is obviously not ideal or a permanent renovation - but it takes care of the storage issue and lets us try out this floorplan for the eventual full kitchen renovation.

new pantry cabinets added to the kitchen island

old pantry gone - this part of the dining room looking normal again. 

So - this kitchen is definitely still ugly - with two different colors of cabinets and now three different types of countertops. But - it no longer looks unfinished and hazardous - and that's a huge improvement for us. All this time in the kitchen has made both of us eager to actually gut it and fix it all the way up - but for now, this is good enough. Now - shifting gears once more to the sleeping porch - our only remaining unfinished space.