Friday, April 22, 2016

Composting!!

In honor of Earth Day, I thought I would try to post something earthy, so let's talk about compost.

First: my enviro disclaimer:
I consider myself to be a bit of a lapsed environmentalist - it was very important to me when I was in my 20s, so I got a couple degrees in environmentally stuff, and then sort of burned out. I found the obsession of other environmentalists to be overwhelming, and didn't like the idea that for many issues, there just isn't a good answer and tradeoffs were often as bad or worse. I have been slowly trying to get back into the swing of things in a balanced way, looking at one aspect of our lives at a time. First, we adopted a Meatless Monday and mostly organic diet, then I upgraded all of our cleaning and personal use chemicals when I was first pregnant and still feeling productive (here). This year is all about reducing our trash, and specifically compost. I do not want to be preachy - and in fact really despise unsolicited advice -- so please don't take this as a preachy holier-than-thou thing. My goal in most life aspects is to try to make one small step towards doing a better job- so this is just the smallish step for us for this year.

Why Compost?
Generally, most food scraps and yard clippings are sent away in our trash and ultimately sent to a landfill. This is a problem for a couple reasons:
  1. Food waste and yard clippings are currently 20-30% of the volume of our trash. Many cities, and large East Coast ones in particular, are out of places to put their trash, so they truck it many miles to mega-landfill facilities. Not only does this mean that we're turning more nice land into really gross land, but we're burning more fossil fuels to get it there.
  2. Once it arrives at a landfill, the organic materials are covered with other trash, preventing a free flow of air, so they decompose anaerobically (meaning without oxygen). This type of decomposition produces methane, which is a potent greenhouse gas, 20x more powerful than plain carbon dioxide. If those same materials are able to decompose aerobically (in the presence of oxygen), then they instead produce carbon dioxide, which is less potent. 
  3. Farming is roughly a process by which seedlings pull nutrients and water out of the soil in order to build big nutrient-rich things like leaves and fruits.  So, the soil left behind is inherently less nutrient-dense because the nutrients are in the leaves and stems and tomatoes. So the farmer has to add back nutrients through the process of fertilization, which can be done with organic or otherwise friendly materials, or can be done with some really strong chemical fertilizers that often just run straight into our waterways creating other havoc downstream.  (This isn't true of all plants - some plants actually pull nutrients out of the air and put them in the soil - but they usually aren't food plants and I would say they are generally not very attractive plants either, so not stuff you likely want to grow in your garden).
Instead, we can take those yard scraps and food waste, let them decompose in oxygen-rich air, keep them out of the landfills, and stick the nutrients back in our yard so that we don't need a lot of other fertilizers. AKA, composting.

look at this fun flower

Previous Attempts:
So I have really wanted to compost for a long time - I actually took a college class on farming and found the whole process to be really inspiring. I waited patiently through several apartment years, and when we finally bought our house - I bought a composter that day. It arrived in early January - long before we'd unpacked any boxes or we'd even really looked at the yard or thought about the garden. I put the massive thing together, hauled it outside, and immediately started dumping our kitchen scraps into it. I bought a little ceramic vessel to sit on the counter and collect the scraps until I could eagerly carry them outside to put them in the composter. I cannot express to you how excited I was to finally get started.

But it didn't work as well as I had hoped. First, I would forget to empty the counter-top container, which would inevitably fill up with bugs and slime. Second, I would forget to water or turn the composter, so it dried out and didn't do anything. Third, I failed to add other types of materials, so the composter started to smell and get gross. Spouso has been threatening to get rid of the thing since it arrived, which is heartbreaking - so this year I'm committed to making this thing actually work.

better soil makes prettier flowers

Research:
I really want this to work this time, so I started out with some basic research. I found a bunch of great sites, here, here and here. The gist is pretty simple:
  • You need a space for the compost to go. If you have a big yard, then you can just dump it on the ground or in a fenced-off area, but if you don't have a lot of space or live in a city, then you probably want a tumbler like mine.
  • You need a mix of materials. "Green" materials are nitrogen dense, like kitchen scraps. They need to be balanced with "Brown" materials, which are carbon dense, like leaves and paper. You don't want anything with meat, dairy or animal waste or you'll attract rats, and you do want the materials to be chopped up or this will take forever.
  • For this equation to work, it needs plenty of water and oxygen, so keep the pile moist and turn it often.

A Second Try:
So, with the wisdom of my prior mistakes, I've been slowly trying this again for the past couple months or so. I moved the composter to a new location, closer to the hose so it can get watered more regularly, but hidden from sight. Instead of the counter-top container that didn't get emptied often enough, I've been using a colander. It just collects the scraps of the day and gets dumped during the evening kitchen cleanup, so nothing has enough time to get nasty, and I can't forget to empty it because I can see the grossness clearly. Every week, I add whatever paper was shredded and some torn-up news print, plus a good douse of water and then I give it a couple turns.

this morning's kitchen scraps

So far, we're doing ok. It doesn't smell and doesn't seem to attract any vermin. There are a few bugs in the composter, but they aren't coming outside or causing issues and appear to be the correct ones that are needed for this process to work. If all goes well, I should have my first batch in a couple months, hopefully during the summer so that I have time to start a second batch.

the composter is tucked away in the corner- mostly out of sight

Concluding Thoughts:
The downfall of my early environmentalism was the feeling that you had to be 100% consistent and get it perfect, or there was no point in trying. Obviously, that's stupid. Just because I don't like to eat salads for every meal doesn't mean that I give up vegetables altogether and eat nothing but pizza-wrapped bacon cookies. (mmmm- now i'm totally thinking about it).  Like everything else that we know we should do - it's better to do a little than nothing at all. So, I'm giving this another go and hoping that it works this time. Happy Earth Day!

Thursday, April 7, 2016

The Master Bedroom Closet and a New Wardrobe

A couple thoughts as spring settles in:

Hello, springtime. Let's talk about clothes. 
  1. Goodbye, Winter Clothes! I don't want to think about winter ever again. In fact, every year as soon as it gets warmish, I boldly take all my coats and hats and heavy sweaters and store them away, out of sight. This is partly so that I have more room in my closet to see the stuff I'm actually using, but also because I hate winter and I don't want to be reminded that it will eventually return. (Actually - it's supposed to snow in a couple days. [sigh])
  2. Hello, Spring Clothes! Just as the winter stuff is getting put away, the summer stuff is coming out of hiding. It's fun every year to pull out the things that were stored away a few months ago- something between getting a bunch of gifts and being reunited with old treasures.
  3. What fits? To make things more complicated, this time last year I was massively pregnant, so none of these spring clothes were getting worn. In fact, between being pregnant for 9+ months, and then spending another 9+ months slowly losing the weight, it's been a really long time since a lot of my clothes fit me. I boxed up a bunch of them to put them out of sight, and now I'm starting to dig through everything to figure out what I have and what fits now.  
  4. Less is More. One of the things I really liked about being pregnant was that I had a really tiny wardrobe (as in, number of items, not size of clothes). I refused to buy a lot of temporary clothes, so I literally only had about 5 outfits- which meant each day I knew exactly what I was going to wear. There are plenty of examples of smart people choosing to have a really small wardrobe to avoid wasting mental effort on trivial choices, so let's go ahead and argue that this is my intent, and not just being otherwise lazy and cheap.
  5. See what you've got. An important part of being organized is being able to see everything you have. You can easily group similar items, and then avoid buying duplicates and know if something's missing. One major issue my closet has is that I can't see what's in it. There's a clothing bar hanging in front of shelves, blocking them from sight. I have a tall dresser hand-me-down with really deep drawers that clothes seem to disappear into. Plus, there are boxes of extra clothes hidden under the bed and various other places - so I have no idea what I have because I can't see any of it.  
The current master closet is this whole wall long, accessed through the door on the left

View to the right: It's a long and skinny closet, with a hanging rod in front of shelves 

So - with all that in mind - I decided to turn my efforts to my closet and the clothes in it. You may remember that our big plan is to convert the current master bedroom, the spare room beside it, and the old sleeping porch into one big master suite. We started it during the Big Renovation, which is now several years ago, when we turned the closet of the spare room into our washer/dryer closet. That small step was a huge improvement for laundry - but a big loss for closet space. We lost a very useful closet that the Spouse Man had been using, so he moved into the Greenroom and I had to move into the closet in the master bedroom. Despite the fact that it's quite big, the closet in the master bedroom is long and narrow, making it really difficult to actually see what's inside - turning it into a huge blackhole for clothes. Our plan is to create a new walk-in closet in the spare room which will be more open and accessible, and to knock down the current useless closet - making the bedroom bigger. I decided to start on making the new walk-in closet so that I could get my wardrobe better organized.


The Long-term Plan for a Master Suite


Step 1. Paint.
I started out by repainting the future closet space. When we first moved in, we (I) picked a tragic shade of baby blue. Then, when the contractors covered over the old door to the old closet, they left the new sheetrock primed white. I figured the new closet needed to be as light and bright as possible, so I just grabbed a leftover can of the slightly off-white shade that we used in the basement.

the corner of the spare room at the start, needing a paint job

Step 2. Get Shelves and Brackets
I priced out the options for wire shelving units, and was surprised to see that they were more expensive than getting real wood - which seems much more solid and attractive anyway. So I ran over to the Depot, picked up some 1x12 boards and brackets,  cut them down to size, and gave them a quick coat of white paint.

Step 3. Install Brackets and Shelves.
Then my spouse very nicely agreed to help me install the new shelves and brackets, which was great since it's easier as a two-man job, and he's not really benefitting from this project just now. He's still using the greenroom closet, so this project is all about me (for now). We just drilled pilot holes to find the stubs, then screwed the brackets into the studs- and then just screwed the boards onto the brackets. We made one high shelf for rarely needed items, one accessible shelf for things I use often, with a hanging bar beneath it, and then one lower shelf for shoes. We added a mirror too, and moved the bookcase that I made for the old office into the space.

brackets going up, saucily

Step 4. Move Everything into the New Space
Very quickly, I moved all my clothes over to the new spot. I was overwhelmed and confused to see that I had so much stuff, knowing that I wear a very small fraction of said stuff. It was clear that I needed to get organized and get rid of some things.

so much stuff.

Step 5. Make a Wardrobe Design Plan
Following my appreciation for a super small maternity wardrobe and my affinity for making design plans before a renovation - I decided to create a capsule wardrobe, if you will. Before we renovate a room, I spend an inordinate amount of time making a design plan. The process is really helpful for me to figure out what we have that I like, what we need for function, and then what looks good and goes together. This takes way more time than you might expect, but it's totally worth it. Once a design plan is done, I have my marching orders - I don't expect to get everything at once (though I occasionally toy with the idea by putting everything in my carts at once to see what it would cost), but I know what to watch for sales and things to keep my eyes open for. I figured the same process would work for a wardrobe too.

So, I scoured my go-to online shops for items I liked, put them all together in a powerpoint slide, and then culled and tweaked until I had a good collection. I tried to build off of the things I already have and like, adding in the stuff that is missing. It's built off a strict color scheme, so that everything goes with everything. I tried to balance the number of items - having more shirts than pants, some long-sleeve and some short-sleeve, etc. I also tried to balance the types of clothes I need with the lifestyle I actually have, (ie, one thing for a date night, one thing for a big meeting, lots of things for the average work day).

My Wardrobe Design Plan
Top Row: 1, 2, 3, 4, 5, 6, 7
Second Row: 1, 2, 3, 4, 5, 6, 7
Third Row: 1, 2, 3, 4, 5, 6, 7
Fourth Row: 1, 2, 3, 4, 5, 6, 7, 8
Bottom Row: 1, 2, 3, 4, 5, 6, 7

Step 6. Cull Ruthlessly
Once I had set my wardrobe design plan, I went back and got rid of anything that didn't fit it. Anything that was outside of the color scheme was easy to get rid of. Next were the items that would definitely never fit again (I'm still losing baby weight, so I had to walk the fine line of keeping clothes that were slightly too small and would likely fit again, while ditching the clothes that were way too small and probably never fit to begin with.). Then I started working on shifting the proportions of things to more accurately fit my lifestyle - 5 black evening gowns were excessive, so I just picked my favorite one or two. It was striking to me how out of proportion everything was - I clearly like to shop for evening dresses and cardigans- you'd think I go to a lot more galas than I do. I had to ask myself, "Do I really need 5 blue v-neck sweaters?" (answer = no). I got everything down to a smaller number of clothes that I actually liked, that fit, and that went together. Everything that was culled went into a pile for goodwill (which will actually hang out at the house for a week or two in case i have second thoughts on anything).

Step 7. Shop with Purpose
Lastly, I had to pick up a few items that were missing. The design plan and culling process identified a couple items that were clearly needed, so I made a list. I did some targeted online shopping as things I had been eyeing went on sale, and then I actually went to the mall. I hate the mall, so I went during a weekday afternoon with a list in hand, knowing that I would be in and out as quickly as possible. I can't express how much I actually hate the mall - but there is value in actually trying things on sometimes.

all done 

from another angle

new use for my bookcase

lots of bins for gym clothes

the top shelf is great for things I don't need often

room between the hangers! 

a mirror on the other wall- framed by my race bibs

Concluding Thoughts:
Obviously the new closet isn't finished. This is only half the storage space we are planning on, and it's lacking some walls, doors, lights, etc. But, it goes a long way towards defining the space and figuring out the best layout for eventually finishing it. For now, this is a huge upgrade for my closet space and really allows me to see what I have. Plus, I'm now completely out of the closet in the master bedroom, so I can toy with the idea of just knocking it down to enlarge the room (perhaps a fun idea for a slow day this summer).

The whole wardrobe process really clarified for me that I have been shopping wrong for a long time. Clearly, just randomly ordering stuff that was on sale didn't result in a useful wardrobe - it just wasted money and left piles of randomness to take up space. I'm really embarrassed by the number of items that got donated with their original tags still on. So, now that I have a better closet space that allows me to see everything I have - I'm committing to being a better clothes shopper, knowing what I have and only shopping for what I need. The idea of a capsule wardrobe is to get down to just 37 items. I'm still way over that, but I made a lot of progress. I see this as more of an aspirational approach that will take constant work. While this is a project that will never be done, for now, it feels so much better knowing that I have a plan and a system in place.

Sunday, March 6, 2016

The Dining Room Door

So, last December we completed the back steps project, which I explained here and here. In the process of getting bids from contractors for the stairs, we asked them to also give us a bid to turn the dining room window into a door. Our theory was that they were two sort of similar projects in the same part of the house, so it might be cheaper to do together.

Well - we ended up doing the stairs on their own because the contractors never got back to us in time. Then, one of the contractors did finally get back to us, after the stairs were already done, with a nice quote for the back porch project. So, even though it wasn't a huge priority and we only ever intended to do it in combo with the stairs - low and behold, we decided to go ahead and do this project now.

The Problem
There is a small patio on the back of the house, off of the dining room windows that we cannot use. When we first moved in, there was a very narrow walkway from the back door, behind the pantry, over to this little porch. During the Big Renovation, we expanded the old pantry to make the new half bath (which I swear is actually going to become a functional bathroom this year), which cut off the little walkway. At the time, we thought that we could just access the porch through the dining room windows, but I think that only happened once or twice before I got massively pregnant (no longer able to get myself through the window) and then the kid arrived (didn't want to carry him and stuff through a window). So, basically we just lost access to our little porch.

the small inaccessible porch

The Goal
We have a nice back yard with a table and chairs and an umbrella, but we don't use it as often as I would like. In the summer, it gets really hot. Even with an umbrella, it's not really covered from the rain and only offers shade to some of the chairs. Even though the new stairs are awesome, it's a bit of a hassle to bring dishes and stuff up and down the stairs and through the two back doors. The table and chairs are nice, but not very comfortable for conversations. So the theory is that the little porch would be an alternate outdoor space that would be more accessible to the kitchen, covered and therefore cooler in the summer. I'm thinking this would be a great morning coffee or evening glass of wine kind of spot.  It's pretty small - so we're not going crazy with lots of extra furniture.

dining room windows, looking out at the small porch

Step 1: Wait
Once we finally signed the contract, we waited for the special-order door to arrive. Then it snowed which caused more delays. Then the door finally arrived, and they could get started.

Step 2: Remove the Window
The first day of work, they removed the old window and cut out the bricks below. They grinded down the remaining cement and stuff to make it flat and smooth and level with the dining room floor.

Day One: Old Window and Bricks are Removed

Step 3: Install the Door 
The next day, they installed the new door by creating a door frame for it and attaching the hinges. They patched the wall, but didn't paint or install the door knob.

Day Two: Door is In

Step 4: Finishing Touches
On the third day, they finished up the trim, and painted the walls.

Day Three: Nearly All Done

Step 5: Paint
We saved a bit of money by having them install a primed, but not painted door, that I planned to paint myself. That, of course, took like a week to finally get around to doing. But eventually, I painted the door, we moved all the furniture back - and this project is done.

Next up, we will want to fix up the patio itself, but since it's still basically winter - that can wait until later. For now, this is already a huge improvement - we get so much more light in the room. Looking forward to actually using this new little space.

All Done - door from the inside 

feeling conflicted about the painted and unpainted trim in the same room

view from the outside

a surprisingly big little porch

so much more light coming into this room

While this was sort of an odd project to do now - we are happy to have tested out a new contractor. We're hoping that we can use them on some future projects, so it was great to get to test them out on something pretty small. Obviously, there is no shortage of projects to do around this house.

Tuesday, February 23, 2016

More Fireplace Room Upgrades

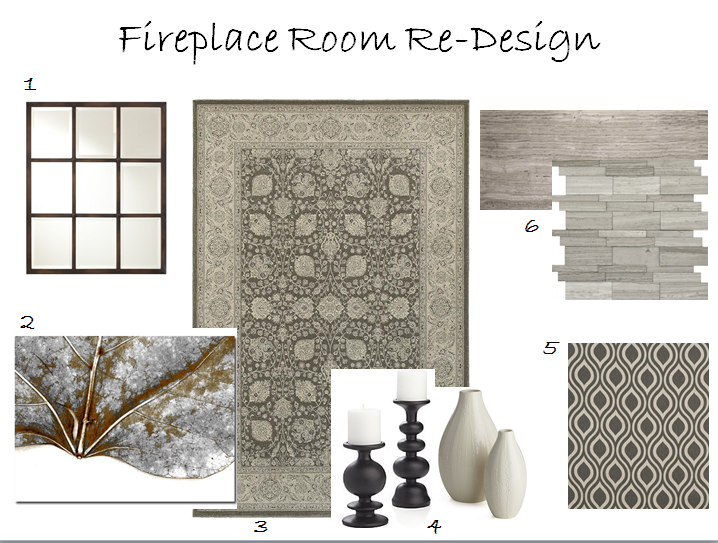
So - I told you last month about our exciting new rugs and the dramatic improvement over the previous ones. Even though the old rug in the fireplace room was a total mismatch for our house, I tried to design around it - which totally didn't work. So, here's the new design plan, centered around the new rug.

  1. A new mirror, maybe metallic
  2. New wall art
  3. Fabulous new rug
  4. A few things for the mantel (here and here)
  5. Fabric for a new chair pillow
  6. Grey marble or limestone tile for the fireplace and hearth
Now that we have a new design plan and made big progress with the new rug - I made a couple more small upgrades to get this room shaping up.

1. New Wall Art
Spouso found this fun print at Etsy, which we both liked. Since it's rare for us to both like the same wall art, and it has a really similar color scheme to the new rug - I bought it immediately. I picked up a cheap, simple frame from Amazon, and then got a new mat from our fancy framing shop - and viola - coolness. We are slowly replacing a lot of wall art that was either print outs of travel pics or in very small frames, (or both), so this is a nice upgrade from what was there before.

2. A New Pillow
We keep one of the extra dining chairs in this room for seating - but it's always looked sort of crappy against the wall of nearly the same shade. Last year, after I made Christmas pillow covers, the bright red Christmas pillow stayed on this chair all year long, just because the contrast was so nice. Well -  I finally made a pillow specifically for this room using more of the same extra fabric I used on the cat radiator seat in the dining room. It has a zipper, so I can remove and wash it if needed (it's basically the same design as the toy bag, without the liner).

Wally models the new pillow and wall art casually. 

3. Wall Patches
There were two eyesores in this small room - one where the old thermostat used to be and the other where a chunk of plaster came loose when the kitchen wall came out and the house shifted. I just pried out the loose plaster, filled with mud, sanded smooth, and painted.

massive wall chunk

wall gets patched (and then painted)

So, clearly not finished - but making some real progress.

Wednesday, January 13, 2016

New Rugs!

Apparently I've mentioned several times how much I hate the rug in the living room. This beige behemoth was left behind by the previous owner of our last house. We never liked it, but couldn't pass up a free, massive rug. The problem is that the color is almost the same as the couches (which we also hate), and only slightly different than the wall color, so it all blends together in a massive beigey boring blah. On top of that, it's solid colored, so it shows every stain and hairball clearly. Plus, it's real wool, which is nice in concept, but really scratchy and uncomfortable to sit on. Basically, I hate this rug.
the dreadful rug

so much beige

ugly couch practically disappears

At the same time, I bought a new rug for the fireplace room just after we moved into this house. I found it on one of those flash-sale sites, and thought it was perfect because it was my color scheme and vaguely trendy. Well, as soon as it arrived, it was clearly a bad fit for the house. The color scheme was boring while the pattern was frenetic, and it turns out we're just not trendy. I tried to decorate the room around it, but it just didn't work. Every time we walked through the room (which is all the time), I cringed at this out-of-place rug.

the blue and white rug

a fireplace room that just isn't working

Then Christmas arrived, and we got a fabulous gift. My mother in law gave us money to buy a new living room rug, but because of a deal, we were able to stretch the money to buy a new rug for the fireplace room too. We got some extra fluffy rug pads from Amazon as well, and now everything has arrived. We happily threw the old rugs out of the way, and unrolled the new ones.

the new living room rug

living room is looking more interesting

the couch no longer disappears against the rug

the new fireplace room rug

fireplace room looking a bit nicer

Then the old rugs were repurposed elsewhere in the house. Eventually I would love to get rid of them altogether, but until then, they are still useful to have around. The beige behemoth got moved to the dining room, which also needed a rug, where it is less ugly because there's more contrast with the furniture and walls. This gives us another padded place for the boy to play while we're in the kitchen - so that's really helpful. The blue and white rug moved upstairs to our spare room which is currently sort of my closet and had an awkward echo happening.

blue and white rug upstairs in the spare room

beige behemoth in the dining room-- not so bad, right? 

Yay Christmas!!! Thank you! Now let me tell you how much I hate the kitchen...

Tuesday, January 5, 2016

Gussied Up Toy Bags

This Christmas we were shopping not only for our own little person, but for our four nieces and nephews as well - ie, we bought a whole bunch of toys from Amazon. For the toys with smallish or numerous parts (like blocks and shapes, etc), I was feeling a little guilty/preemptively annoyed that they would be opened on Christmas day, quickly poured all over the floor, and stepped on, with some pieces never to be seen again. To keep things together and organized- I thought it might be helpful to make little bags. I like the idea of making homemade gifts anyway, and we still have a lot of leftover fabric from the kid's room projects to use up - so this is perfect.

Note: I actually made drawstring bags after thinking through the process and building my own pattern. Once I was done, I was devastated that my bags wouldn't close all the way - leaving an opening about the size of a hand that toys would easily fall through. A quick search of mom blogs and pinterest suggests that everyone else has the same problem (it's the same reason that pole-pocket curtains won't open all the way, you're trying to compress fabric without giving it anywhere to go). So I decided to go back and retrofit my nearly-finished bags to have zippers instead so that they would actually close all the way. The directions below are what I should've done from the start, based on the infinite wisdom of Martha.

Step 1. Shopping and Prep
First up, find a good sturdy fabric that can take some abuse (I used leftover cotton drapery fabric), and wash and dry it to preshrink. Then iron and cut out two large rectangles, sized to whatever you're trying to hold. (I used a large cutting board as a pattern). Then take the lining fabric and cut out two rectangles the same size as the exterior pieces. I also bought a pack of multicolored zippers to close the top.

Step 2. Make it Fancy
This is totally unnecessary, but a fun step to make things a little more personal/difficult. Using another Martha idea, with some variegated embroidery thread and an embroidery needle, I just made some simple running stitches and backstitches to add highlights and trace around some of the patterns in the fabric. The idea is just to add a little texture and visual interest, nothing super complicated. This step is easier to do now before the bag is put together so that you can access the back of the fabric, but be careful to stay away from the edges of the fabric, which may get cut off when the bag is put together. [FYI - this is why the bag is lined. If it weren't lined, you'd be able to see the backside of all this stitching, which is unattractive and could snag on toys.]

embroidering around a starfish

closeup - note the cool ombre thread happening

Step 3. Sew the Fabric to the Zipper
Once the detail work is done, it's time to put the bag together. Layer the exterior fabric on the bottom (facing up), then the zipper (facing down), then the liner (facing up). Then sew across the top. Flip, and repeat for the other half of the bag.


Step 4. Sew Panels Together
Now all four pieces of fabric are sewn to the zipper, but not each other. So pull the liners together (facing each other) and the exterior pieces together (facing each other) and sew the three sides of each panel. Don't sew over the zipper, and don't sew the liners all the way closed.


Step 5. Flip and Hand Stitch
Using the remaining opening in the liners, flip the bag right-side out. Hand stitch the remaining gap in the panels, then push the liners through the zipper into the exterior panels. The bag should now be finished.


Step 6. Add Ribbon, stuff with toys
Lastly, I added a couple inches of ribbon to the zipper pull, just to make it a little easier to grab. Then the bags are truly all the way done and ready to be stuffed with whatever needs to be put away. For us right now, it's small teething toys.

a bit of ribbon added to the zipper makes it easier to pull

finished bag holding our many teething toys

soooo many teething toys.