Friday, December 29, 2017

Final Renovation Reveal

I think things were pretty much finished up in my last post - we just had to clean up and put a few last things away. The big difference has been actually moving back into these rooms and getting to use them. Finding out if all of our years of thinking about this project, planning, and imagining how the space would work would actually pan out. 

In the kitchen - we had to make a few compromises, but mostly this is exactly what I'd hoped. My favorite part is still the short wall the holds the coffee maker and all the dishes. It turned out to be big enough to also hold the liquor stash, so now coffee cups and coffee maker are next to each other, just like wine glasses and wine bottles - so one of us can pop in for a refill without getting in the way of 
the chef. 

my favorite coffee and booze wall

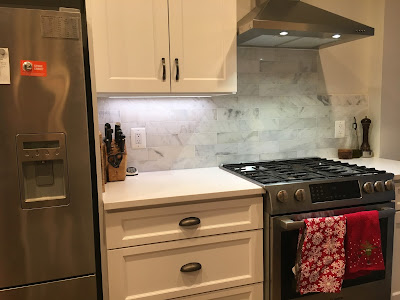
We added lots of new workspace by the stove and on the island. Now it's much easier to move between the stove, fridge and sink, but also to have two cooks at the same time. 

bigger workspace between the stove and fridge

huge island workspace

a good space for a second cook to chop

The other huge improvement is the lighting. It's amazing what a difference it makes - but just having a few options and the flexibility to turn things brighter or dimmer as needed is huge. It's hard to remember how dark this kitchen used to be. 

pendants matching the mudroom

so many lighting options


very different view of the back door

The other big layout improvement was moving the sink - now I can wash dishes with a clear view of the dining room and living room - making the endless task seem less horrible because I can stay involved in the rest of the house. Generally, even though we couldn't make the kitchen any bigger, we definitely made it much more functional.

view from the sink

washing dishes while watching the boy eat

getting coffee

 Upstairs, the new master suite is such a huge improvement. Instead of having three awkward space - the small master bedroom, unfinished sleeping porch, and small spare bedroom, we now have one cohesive suite.

view of the new suite

The new bath is amazing. Not only do we have a double vanity, we have two separate medicine cabinets so we don't have to share toothpastes.  The shower is huge and gorgeous, and nicely separate so that someone can be brushing their teeth while the other is in the shower without being in the way.

double vanity and double mirrors

view toward shower room

huge shower

view back towards the bedroom and closet

By removing the old closet in the bedroom, the master bedroom got huge. We can fit the bed in the space where the closet used to be, squarely under the new skylight. It really opens up the floor plan for the room. The skylight is also just a huge improvement - this room was so dark before, but now we don't need lights on during the middle of the day anymore.

the bed fits in the alcove where the closet used to be

cats like the new skylight

view towards the office

big open floor space in the room now

So - I think it's officially done now. The contractors are gone, the dust is mostly cleaned up, and things are pretty much put away.  It's been a long couple of months, but we are relieved to finally have our house back, and so much better than when it started.

old view of the bedroom closet 

the old kitchen

the old sleeping porch

Wednesday, December 20, 2017

Renovation Update: Finishing Up

So - the last two weeks have been all about finishing up, cleaning up, and getting the house back together. 

Kitchen
They finished installing the cabinets, and then we had to wait for the countertops to arrive. While we waited, the electrician came back to finish all the lighting and outlets - which look amazing. Everything's on a dimmer, so we have lots of options to make it really bright for cooking, or dimmer and cozy. We almost immediately started putting things in the cabinets - glass cabinets are trickier than I expected. I also got to work staining the floor, making it the same color as the upstairs which we refinished a couple years ago, and then giving it 2 coats of poly to protect it. (I want to do another coat, but haven't gotten the chance). Lastly- the countertops finally arrived, so they were installed, and then the sink was hooked up. I got to work painting the walls, which makes everything look clean again. The cabinet above the fridge doesn't fit though, so we had to reorder a new one and wait to get switched out - otherwise, we're basically done. 

lights are on!

floor gets a quick sanding

then stain

then poly - almost done

 stuff going in the cabinets

counters arrive! 

Upstairs
They finished the tile in the shower, and installed the toilet and towel racks. Unfortunately, they broke the shower doors while trying to install, so then we had to wait for new ones to arrive. While we waited, they installed the heater in the office and trimmed that window, which were two small things we wanted to do to that room, but we'll plan to actually finish it ourselves. After some debate, they also patched the floor where the old closet walls had been in the bedroom - making it almost seamless.
 
new linen closet all trimmed out (on the right)

floor getting patched where the old closet walls were
 
office baseboard heater and window trim

tile done - shower doors getting finished up

toilet and a cat (they like the heated floors)

vanity all functional

clothes going back in the massive closet

Clean up and Put things Back
The biggest development though, was that they finally took down all the remaining curtains and floor covers, which let me finally vacuum and dust everything. With an almost fully functional kitchen, we took apart the temporary kitchen in the dining room and half bath, and got those spaces back in order. The house still has a few boxes and paint cans around, but it's feeling almost back to normal.

able to cook again! 

The guys are finishing up the punch list right now - so hopefully they will be all done and out of our house. I will post the final revel asap.

Wednesday, December 13, 2017

Main Bath - Radiator and Lights

After the epic battle stripping the door, we didn't have capacity for any major other projects for this room. Instead, I just had a few little tweaks to make the room a little more functional and attractive.

The Radiator
First, the radiator was driving me crazy. There has always been this cage box thing covering it up, which is so large that it blocks my towel rack. So my towel is either bunched up so it never dries, or hanging over the stairs or somewhere else inappropriate. Plus the cage thing is ugly. So we took it off, I cleaned up the radiator, dusting off a hundred years of dust bunnies, and then gave it a light coat of radiator spray paint. The radiator is quite ornate, and much smaller than the cage was, so now my towel can actually fit on the rack - and should be nicely toasty!

radiator cage - cutting off my towel rack

cage removed, radiator cleaned up but dingy

getting sprayed

all done- my towel fits now!

Little Shelf
As soon as the radiator cage came off, it was clear we had created a new problem. Despite its ugliness and towel-blocking issues, it had been a helpful place to store things. So helpful, in fact, that it was always covered in stuff. So - I needed a replacement that was small enough not to block the towel rack, but just large enough to store one or two things. For simplicity sake, I just cut a spare board down to the length of the radiator, stained it, and placed it on top. I could've made something more complex, but hey.

little shelf for holding just a bit of stuff

Lights
Not a functional issue really, but we always hated the sconces in this room, which are super deco and also hum loudly. So - I just ordered 2 new ones in a basic style and finish that matches the rest of the house. Once we had a sunny weekend day without guys in the house, we finally switched them out. 

old lights - huge and hideous
 
new lights! 

New Art
Just a small thing, but I ordered a print from etsy and stuck it in one of our existing frames. Something to add a little color and make this look more like a kids' bathroom. (got it here). 
new wall art - both bathy and kidish

new art up over the new shelf

remember this? so much better now!

And now I'm calling it done. I had bigger ideas for this room - tearing out the closet, or replacing the sink - but for now - this is good enough. We need to switch over to another project. More on that soon. 

Wednesday, December 6, 2017

Main Bath - Door and Trim

So after I scraped and painted the walls and ceiling in the main bathroom, the trim started looking really bad. We clearly had more hazards to address.  

The Door:
The door had been painted many many times and was pealing and cracking in all the corners. As part of my on-going paint chip removal initiative, I wanted to fix it. So during our weekend naptime, I grabbed my heat gun and started to remove it. I was shocked to find the door underneath was stained and in pretty good shape. I spent an hour or so on three different days, and got it about as far as I could - most of the paint was gone, but it was still sort of gunky. So we took it off its hinges, took it out to the garage, and coated it with stripper. That removed the remaining scuz, but there were still a few spots left. I had one more night with the heat gun to get a couple more of the thick patches, one more round of stripper to clean it off again,  and then just stained it and coated it with poly and put it back up. Altogether - this was probably around 15 hours of unpleasant work, so I will think long and hard about painting a stained door again. (Sidenote: I don't recommend taking your bathroom door off for a week while you have lots of strangers in the house-- makes things really awkward). 

the offending door

closeup of some of the cracking and pealing paint

there's just so much pealing paint

after one day with the heat gun - hello stained door!

after another day or two with the heat gun - still gunky. 

after 1 round of stripper

and another round of heat gun

stripped, sanded, stained, and back in place!

Trim
While the door was off its hinges and waiting outside, I ended up grabbing a brush and giving the other door and trim a quick coat of paint. After spending so much time trying to remove paint, I felt bad adding yet another layer to the closet door - but it wasn't chipping or in bad enough shape to need to be stripped, and now it just looks brighter and cleaner, with no chipping paint!

closet door getting painted

trim gets freshened up

So now there is no more pealing paint in this small room, but there are a couple more little things I want to do to improve the functionality of this space and make it a little nicer looking.